angr初探
# PREFACE:最近遇到需要动态模拟的题比较多,这里还是系统学一下 angr
# ps. angr 的文档还是写的比较有意思而且详细的,适合当睡前读物,点名批评某二进制分析工具的文档…
# 参考链接:
jakespringer/angr_ctf (github.com)
# 虚拟环境
angr 官方推荐在虚拟环境中运行,防止与外部包冲突(例如 keystone 和 keystone-engine 冲突,这里用的是 keystone-engine )
pip install virtualenv

# 在当前目录下创建名为 angr-venv的新目录,包含干净的python环境
virtualenv angr-venv

Windows:
angr-venv\Scripts\activate

Linux/Mac:
source angr-venv/bin/activate

pip install angr

退出虚拟环境:
deactivate
# 使用样例
# 导入模块
import angr | |
proj = angr.Project('./file') |
# 命令行使用时可以导入 monkeyhex 转化为十六进制输出
import monkeyhex # this will format numerical results in hexadecimal |
# project 的基础属性
proj.entry # 文件的入口点 | |
proj.filename # 文件名 | |
proj.arch # 文件的架构 | |
- proj.arch.name # x86/x86-64/ARM | |
- proj.arch.bits # 32/64 | |
- proj.arch.bytes # bytes per instruction, eg : 4/8 | |
- proj.arch.memory_endness # 字节序,例如 Iend_LE 代表小端序 |
proj.loader # 显示已加载对象,内存映射的地址范围 | |
# <Loaded [file_name], maps [0x400000:0x5004000]> | |
proj.loader.shared_objects # 已加载的所有共享对象,共享库或动态链接库及其内存映射 | |
# OrderedDict([('angr', <ELF Object angr, maps [0x8048000:0x804c033]>), ('libc.so.6', <ELF Object libc.so.6, maps [0x8100000:0x83347bb]>), ('ld-linux.so.2', <ELF Object ld-linux.so.2, maps [0x8400000:0x8437a37]>), ('extern-address space', <ExternObject Object cle##externs, maps [0x8500000:0x8507fff]>), ('cle##tls', <ELFTLSObjectV2 Object cle##tls, maps [0x8600000:0x8614807]>)]) | |
proj.loader.min_addr # 加载的二进制文件占用的内存空间的界限 | |
# 0x8048000 | |
proj.loader.max_addr | |
# 0x8707fff | |
proj.loader.main_object # 返回代表主要加载的二进制文件的对象 | |
# <ELF Object angr, maps [0x8048000:0x804c033]> | |
proj.loader.main_object.execstack # 返回 bool,代表主二进制文件是否具有可执行堆栈 | |
# False | |
proj.loader.main_object.pic # 二进制文件是否为位置独立代码,若返回 True,则说明开启了 ASLR | |
# False |
# 对基本块的操作
block = proj.factory.block(proj.entry) # 打印入口的基本块的汇编 | |
block.pp() | |
""" | |
80490b0 endbr32 | |
80490b4 xor ebp, ebp | |
80490b6 pop esi | |
80490b7 mov ecx, esp | |
80490b9 and esp, 0xfffffff0 | |
80490bc push eax | |
80490bd push esp | |
80490be push edx | |
80490bf call 0x80490dd | |
""" | |
block.instructions # 该基本块的指令数量 | |
# 9 | |
block.instruction_addrs # 该基本块指令地址 | |
# (134516912, 134516916, 134516918, 134516919, 134516921, 134516924, 134516925, 134516926, 134516927) | |
block.capstone # 打印人类可读汇编形式(与.pp () 类同) | |
block.vex # 打印 IR 代码形式 | |
""" | |
IRSB { | |
t0:Ity_I32 t1:Ity_I32 t2:Ity_I32 t3:Ity_I32 t4:Ity_I32 t5:Ity_I32 t6:Ity_I32 t7:Ity_I32 t8:Ity_I32 t9:Ity_I32 t10:Ity_I32 t11:Ity_I32 t12:Ity_I32 t13:Ity_I32 t14:Ity_I32 t15:Ity_I32 t16:Ity_I32 t17:Ity_I32 t18:Ity_I32 t19:Ity_I32 t20:Ity_I32 t21:Ity_I32 t22:Ity_I32 t23:Ity_I32 t24:Ity_I32 t25:Ity_I32 | |
00 | ------ IMark(0x80490b0, 4, 0) ------ | |
01 | ------ IMark(0x80490b4, 2, 0) ------ | |
02 | PUT(ebp) = 0x00000000 | |
03 | PUT(eip) = 0x080490b6 | |
04 | ------ IMark(0x80490b6, 1, 0) ------ | |
05 | t4 = GET:I32(esp) | |
06 | t3 = LDle:I32(t4) | |
07 | t15 = Add32(t4,0x00000004) | |
08 | PUT(esi) = t3 | |
09 | ------ IMark(0x80490b7, 2, 0) ------ | |
10 | PUT(ecx) = t15 | |
11 | ------ IMark(0x80490b9, 3, 0) ------ | |
12 | t5 = And32(t15,0xfffffff0) | |
13 | PUT(cc_op) = 0x0000000f | |
14 | PUT(cc_dep1) = t5 | |
15 | PUT(cc_dep2) = 0x00000000 | |
16 | PUT(cc_ndep) = 0x00000000 | |
17 | PUT(eip) = 0x080490bc | |
18 | ------ IMark(0x80490bc, 1, 0) ------ | |
19 | t8 = GET:I32(eax) | |
20 | t17 = Sub32(t5,0x00000004) | |
21 | PUT(esp) = t17 | |
22 | STle(t17) = t8 | |
23 | PUT(eip) = 0x080490bd | |
24 | ------ IMark(0x80490bd, 1, 0) ------ | |
25 | t19 = Sub32(t17,0x00000004) | |
26 | PUT(esp) = t19 | |
27 | STle(t19) = t17 | |
28 | PUT(eip) = 0x080490be | |
29 | ------ IMark(0x80490be, 1, 0) ------ | |
30 | t12 = GET:I32(edx) | |
31 | t21 = Sub32(t19,0x00000004) | |
32 | PUT(esp) = t21 | |
33 | STle(t21) = t12 | |
34 | PUT(eip) = 0x080490bf | |
35 | ------ IMark(0x80490bf, 5, 0) ------ | |
36 | t23 = Sub32(t21,0x00000004) | |
37 | PUT(esp) = t23 | |
38 | STle(t23) = 0x080490c4 | |
NEXT: PUT(eip) = 0x080490dd; Ijk_Call | |
} | |
""" |
# 模拟状态 SimState
state = proj.factory.entry_state() | |
# <SimState @ 0x80490b0> | |
print(state) | |
print(state.regs.eip) | |
print(state.regs.eax) | |
print(state.mem[proj.entry].int.resolved) | |
""" | |
<BV32 0x80490b0> | |
<BV32 0x1c> | |
<BV32 0xfb1e0ff3> | |
""" | |
# 注意这里的描述,给出官方解释: | |
# - Those aren’t Python ints! Those are bitvectors. Python integers don’t have the same semantics as words on a CPU, e.g. wrapping on overflow, so we work with bitvectors, which you can think of as an integer as represented by a series of bits, to represent CPU data in angr. Note that each bitvector has a .length property describing how wide it is in bits. | |
state.solver.eval(state.regs.eax) # 转化为 python int | |
bv = state.solver.BVV(0x1234, 32) # 反过来创建,create a 32-bit-wide bitvector with value 0x1234 | |
bv = state.solver.BVV(0x1111, 32) # 修改寄存器值 | |
state.regs.eax = bv | |
state.mem[0x1000].long = 4 # 修改内存中的值 | |
print(state.mem[0x1000].long.resolved) | |
# <BV32 0x4> | |
""" | |
mem的官方描述: | |
The mem interface is a little confusing at first, since it’s using some pretty hefty Python magic. The short version of how to use it is: | |
Use array[index] notation to specify an address | |
Use .<type> to specify that the memory should be interpreted as type (common values: char, short, int, long, size_t, uint8_t, uint16_t…) | |
From there, you can either: | |
Store a value to it, either a bitvector or a Python int | |
Use .resolved to get the value as a bitvector | |
Use .concrete to get the value as a Python int | |
""" |
# 模拟管理器 Simulation Managers
simgr = proj.factory.simulation_manager(state) # 创建一个新的 SimulationManager 实例,它将负责管理程序的所有可能的执行路径,包括路径的分叉、合并和死亡 | |
simgr.active | |
""" | |
拟管理器维护了几个不同的状态列表,这些列表代表了程序执行的不同阶段。这些列表包括:active、unconstrained、deadended、errored等。 | |
simgr.active是一个包含所有“活动”路径的列表。所谓“活动”路径,指的是那些还在进行中、未遇到任何终止条件的路径。这些是可以继续推进执行的路径。 | |
通过查看simgr.active列表,您可以了解当前有多少执行路径正在被模拟管理器管理,并且可以对这些路径进行进一步的查询或操作。 | |
""" |
import angr | |
proj = angr.Project('./angr') | |
state = proj.factory.entry_state() | |
simgr = proj.factory.simulation_manager(state) | |
print(simgr) | |
print(simgr.active) | |
print(simgr.active[0].regs.eip) | |
print('---') | |
simgr.step() | |
print(simgr.active) | |
print(simgr.active[0].regs.eip) | |
""" 这里执行了一整个基本块(注意:smigr不会改变state的信息) | |
<SimulationManager with 1 active> | |
[<SimState @ 0x80490b0>] | |
<BV32 0x80490b0> | |
--- | |
[<SimState @ 0x80490dd>] | |
<BV32 0x80490dd> | |
""" |
# Analyses
>>> proj.analyses. # Press TAB here in ipython to get an autocomplete-listing of everything: | |
proj.analyses.BackwardSlice proj.analyses.CongruencyCheck | |
proj.analyses.reload_analyses proj.analyses.BinaryOptimizer | |
proj.analyses.DDG proj.analyses.StaticHooker | |
proj.analyses.BinDiff proj.analyses.DFG | |
proj.analyses.VariableRecovery proj.analyses.BoyScout | |
proj.analyses.Disassembly proj.analyses.VariableRecoveryFast | |
proj.analyses.CDG proj.analyses.GirlScout | |
proj.analyses.Veritesting proj.analyses.CFG | |
proj.analyses.Identifier proj.analyses.VFG | |
proj.analyses.CFGEmulated proj.analyses.LoopFinder | |
proj.analyses.VSA_DDG proj.analyses.CFGFast | |
proj.analyses.Reassembler |
(未必准确的解释,后续慢慢验证)

import angr | |
proj = angr.Project('./angr', auto_load_libs=False) # 不加载所有依赖的外部动态链接库,防止出现额外开销以及库不兼容的报错等等问题 | |
cfg = proj.analyses.CFGFast() | |
print(cfg) | |
print('----') | |
print(cfg.graph.nodes()) | |
entry_node = cfg.get_any_node(proj.entry) | |
print('----') | |
print(entry_node) |
# The Loader
# All loaded objects | |
>>> proj.loader.all_objects | |
[<ELF Object fauxware, maps [0x400000:0x60105f]>, | |
<ELF Object libc-2.23.so, maps [0x1000000:0x13c999f]>, | |
<ELF Object ld-2.23.so, maps [0x2000000:0x2227167]>, | |
<ELFTLSObject Object cle##tls, maps [0x3000000:0x3015010]>, | |
<ExternObject Object cle##externs, maps [0x4000000:0x4008000]>, | |
<KernelObject Object cle##kernel, maps [0x5000000:0x5008000]>] | |
# This is the "main" object, the one that you directly specified when loading the project | |
>>> proj.loader.main_object | |
<ELF Object fauxware, maps [0x400000:0x60105f]> | |
# This is a dictionary mapping from shared object name to object | |
>>> proj.loader.shared_objects | |
{ 'fauxware': <ELF Object fauxware, maps [0x400000:0x60105f]>, | |
'libc.so.6': <ELF Object libc-2.23.so, maps [0x1000000:0x13c999f]>, | |
'ld-linux-x86-64.so.2': <ELF Object ld-2.23.so, maps [0x2000000:0x2227167]> } | |
# Here's all the objects that were loaded from ELF files | |
# If this were a windows program we'd use all_pe_objects! | |
>>> proj.loader.all_elf_objects | |
[<ELF Object fauxware, maps [0x400000:0x60105f]>, | |
<ELF Object libc-2.23.so, maps [0x1000000:0x13c999f]>, | |
<ELF Object ld-2.23.so, maps [0x2000000:0x2227167]>] | |
# Here's the "externs object", which we use to provide addresses for unresolved imports and angr internals | |
>>> proj.loader.extern_object | |
<ExternObject Object cle##externs, maps [0x4000000:0x4008000]> | |
# This object is used to provide addresses for emulated syscalls | |
>>> proj.loader.kernel_object | |
<KernelObject Object cle##kernel, maps [0x5000000:0x5008000]> | |
# Finally, you can to get a reference to an object given an address in it | |
>>> proj.loader.find_object_containing(0x400000) | |
<ELF Object fauxware, maps [0x400000:0x60105f]> |
>>> obj = proj.loader.main_object | |
# The entry point of the object | |
>>> obj.entry | |
0x400580 | |
>>> obj.min_addr, obj.max_addr | |
(0x400000, 0x60105f) | |
# Retrieve this ELF's segments and sections | |
>>> obj.segments | |
<Regions: [<ELFSegment memsize=0xa74, filesize=0xa74, vaddr=0x400000, flags=0x5, offset=0x0>, | |
<ELFSegment memsize=0x238, filesize=0x228, vaddr=0x600e28, flags=0x6, offset=0xe28>]> | |
>>> obj.sections | |
<Regions: [<Unnamed | offset 0x0, vaddr 0x0, size 0x0>, | |
<.interp | offset 0x238, vaddr 0x400238, size 0x1c>, | |
<.note.ABI-tag | offset 0x254, vaddr 0x400254, size 0x20>, | |
...etc | |
# You can get an individual segment or section by an address it contains: | |
>>> obj.find_segment_containing(obj.entry) | |
<ELFSegment memsize=0xa74, filesize=0xa74, vaddr=0x400000, flags=0x5, offset=0x0> | |
>>> obj.find_section_containing(obj.entry) | |
<.text | offset 0x580, vaddr 0x400580, size 0x338> | |
# Get the address of the PLT stub for a symbol | |
>>> addr = obj.plt['strcmp'] | |
>>> addr | |
0x400550 | |
>>> obj.reverse_plt[addr] | |
'strcmp' | |
# Show the prelinked base of the object and the location it was actually mapped into memory by CLE | |
>>> obj.linked_base | |
0x400000 | |
>>> obj.mapped_base | |
0x400000 |
# Symbols and Relocations
CLE 寻找符号地址
>>> strcmp = proj.loader.find_symbol('strcmp') | |
>>> strcmp | |
<Symbol "strcmp" in libc.so.6 at 0x1089cd0> |
The Symbol object has three ways of reporting its address:
.rebased_addris its address in the global address space. This is what is shown in the print output..linked_addris its address relative to the prelinked base of the binary. This is the address reported in, for example,readelf(1)..relative_addris its address relative to the object base. This is known in the literature (particularly the Windows literature) as an RVA (relative virtual address).
>>> strcmp.name | |
'strcmp' | |
>>> strcmp.owner | |
<ELF Object libc-2.23.so, maps [0x1000000:0x13c999f]> | |
>>> strcmp.rebased_addr # 进程虚拟内存中的地址 | |
0x1089cd0 | |
>>> strcmp.linked_addr #链接时分配的地址 | |
0x89cd0 | |
>>> strcmp.relative_addr # 被加载到的预定基地址 | |
0x89cd0 |
>>> strcmp.is_export | |
True | |
>>> strcmp.is_import | |
False | |
# On Loader, the method is find_symbol because it performs a search operation to find the symbol. | |
# On an individual object, the method is get_symbol because there can only be one symbol with a given name. | |
>>> main_strcmp = proj.loader.main_object.get_symbol('strcmp') | |
>>> main_strcmp | |
<Symbol "strcmp" in fauxware (import)> | |
>>> main_strcmp.is_export | |
False | |
>>> main_strcmp.is_import | |
True | |
>>> main_strcmp.resolvedby | |
<Symbol "strcmp" in libc.so.6 at 0x1089cd0> |
# Relocations don't have a good pretty-printing, so those addresses are Python-internal, unrelated to our program | |
>>> proj.loader.shared_objects['libc.so.6'].imports | |
{'__libc_enable_secure': <cle.backends.elf.relocation.amd64.R_X86_64_GLOB_DAT at 0x7ff5c5fce780>, | |
'__tls_get_addr': <cle.backends.elf.relocation.amd64.R_X86_64_JUMP_SLOT at 0x7ff5c6018358>, | |
'_dl_argv': <cle.backends.elf.relocation.amd64.R_X86_64_GLOB_DAT at 0x7ff5c5fd2e48>, | |
'_dl_find_dso_for_object': <cle.backends.elf.relocation.amd64.R_X86_64_JUMP_SLOT at 0x7ff5c6018588>, | |
'_dl_starting_up': <cle.backends.elf.relocation.amd64.R_X86_64_GLOB_DAT at 0x7ff5c5fd2550>, | |
'_rtld_global': <cle.backends.elf.relocation.amd64.R_X86_64_GLOB_DAT at 0x7ff5c5fce4e0>, | |
'_rtld_global_ro': <cle.backends.elf.relocation.amd64.R_X86_64_GLOB_DAT at 0x7ff5c5fcea20>} |
# Loading Options
If you are loading something with angr.Project and you want to pass an option to the cle.Loader instance that Project implicitly creates, you can just pass the keyword argument directly to the Project constructor, and it will be passed on to CLE. You should look at the CLE API docs. if you want to know everything that could possibly be passed in as an option, but we will go over some important and frequently used options here.
We’ve discussed auto_load_libs already - it enables or disables CLE’s attempt to automatically resolve shared library dependencies, and is on by default. Additionally, there is the opposite, except_missing_libs , which, if set to true, will cause an exception to be thrown whenever a binary has a shared library dependency that cannot be resolved.
You can pass a list of strings to force_load_libs and anything listed will be treated as an unresolved shared library dependency right out of the gate, or you can pass a list of strings to skip_libs to prevent any library of that name from being resolved as a dependency. Additionally, you can pass a list of strings (or a single string) to ld_path , which will be used as an additional search path for shared libraries, before any of the defaults: the same directory as the loaded program, the current working directory, and your system libraries.
If you want to specify some options that only apply to a specific binary object, CLE will let you do that too. The parameters main_opts and lib_opts do this by taking dictionaries of options. main_opts is a mapping from option names to option values, while lib_opts is a mapping from library name to dictionaries mapping option names to option values.
The options that you can use vary from backend to backend, but some common ones are:
backend- which backend to use, as either a class or a namebase_addr- a base address to useentry_point- an entry point to usearch- the name of an architecture to use
Example:
>>> angr.Project('examples/fauxware/fauxware', main_opts={'backend': 'blob', 'arch': 'i386'}, lib_opts={'libc.so.6': {'backend': 'elf'}}) | |
<Project examples/fauxware/fauxware> |
# Symbolic Function Summaries
angr/angr/procedures at master · angr/angr (github.com)
# hook
The mechanism by which angr replaces library code with a Python summary is called hooking, and you can do it too! When performing simulation, at every step angr checks if the current address has been hooked, and if so, runs the hook instead of the binary code at that address. The API to let you do this is proj.hook(addr, hook), where hook is a SimProcedure instance. You can manage your project’s hooks with .is_hooked, .unhook, and .hooked_by, which should hopefully not require explanation. | |
There is an alternate API for hooking an address that lets you specify your own off-the-cuff function to use as a hook, by using proj.hook(addr) as a function decorator. If you do this, you can also optionally specify a length keyword argument to make execution jump some number of bytes forward after your hook finishes. |
stub_func = angr.SIM_PROCEDURES['stubs']['ReturnUnconstrained'] # this is a CLASS | |
>>> proj.hook(0x10000, stub_func()) # hook with an instance of the class | |
>>> proj.is_hooked(0x10000) # these functions should be pretty self-explanitory | |
True | |
>>> proj.hooked_by(0x10000) | |
<ReturnUnconstrained> | |
>>> proj.unhook(0x10000) | |
>>> @proj.hook(0x20000, length=5) | |
... def my_hook(state): | |
... state.regs.rax = 1 | |
>>> proj.is_hooked(0x20000) | |
True |
可以尝试
import angr | |
proj = angr.Project('./angr', auto_load_libs=False) | |
state = proj.factory.entry_state() | |
@proj.hook(proj.entry) | |
def my_hook(state): | |
print('startttttttt!!!!!!!!') | |
simgr = proj.factory.simulation_manager(state) | |
simgr.run() | |
# startttttttt!!!!!!!! |
然后可以进行 hook 修改寄存器等操作
import angr | |
proj = angr.Project('./angr', auto_load_libs=False) | |
state = proj.factory.entry_state() | |
simgr = proj.factory.simulation_manager(state) | |
print(simgr.active[0].regs.eax) | |
@proj.hook(proj.entry) | |
def my_hook(state): | |
print('startttttttt!!!!!!!!') | |
simgr.active[0].regs.eax = state.solver.BVV(0x1111, 32) | |
print(simgr.active[0].regs.eax) | |
simgr.run() | |
""" | |
<BV32 0x1c> | |
startttttttt!!!!!!!! | |
<BV32 0x1111> | |
""" |
# 符号样例
# Bitvectors
>>> one = state.solver.BVV(1, 64) | |
>>> one | |
<BV64 0x1> | |
# Create a bitvector symbol named "x" of length 64 bits | |
>>> x = state.solver.BVS("x", 64) | |
>>> x | |
<BV64 x_9_64> | |
>>> y = state.solver.BVS("y", 64) | |
>>> y | |
<BV64 y_10_64> | |
>>> x + one | |
<BV64 x_9_64 + 0x1> | |
>>> (x + one) / 2 | |
<BV64 (x_9_64 + 0x1) / 0x2> | |
>>> x - y | |
<BV64 x_9_64 - y_10_64> |
可以通过 ASTs 分析
>>> tree = (x + 1) / (y + 2) | |
>>> tree | |
<BV64 (x_9_64 + 0x1) / (y_10_64 + 0x2)> | |
>>> tree.op | |
'__floordiv__' | |
>>> tree.args | |
(<BV64 x_9_64 + 0x1>, <BV64 y_10_64 + 0x2>) | |
>>> tree.args[0].op | |
'__add__' | |
>>> tree.args[0].args | |
(<BV64 x_9_64>, <BV64 0x1>) | |
>>> tree.args[0].args[1].op | |
'BVV' | |
>>> tree.args[0].args[1].args | |
(1, 64) |
# Symbolic Constraints
Performing comparison operations between any two similarly-typed ASTs will yield another AST - not a bitvector, but now a symbolic boolean.
>>> x == 1 | |
<Bool x_9_64 == 0x1> | |
>>> x == one | |
<Bool x_9_64 == 0x1> | |
>>> x > 2 | |
<Bool x_9_64 > 0x2> | |
>>> x + y == one_hundred + 5 | |
<Bool (x_9_64 + y_10_64) == 0x69> | |
>>> one_hundred > 5 | |
<Bool True> | |
>>> one_hundred > -5 # One tidbit you can see from this is that the comparisons are unsigned by default. The -5 in the last example is coerced to <BV64 0xfffffffffffffffb>, which is definitely not less than one hundred. | |
# signed : one_hundred.SGT(-5) | |
<Bool False> |
判断
yes = one == 1 | |
no = one == 2 | |
maybe = x == y | |
state.solver.is_true(yes) | |
True | |
state.solver.is_false(yes) | |
False | |
state.solver.is_true(no) | |
False | |
state.solver.is_false(no) | |
True | |
state.solver.is_true(maybe) | |
False | |
state.solver.is_false(maybe) | |
False |
# Constraint Solving
>>> state.solver.add(x > y) | |
>>> state.solver.add(y > 2) | |
>>> state.solver.add(10 > x) | |
>>> state.solver.eval(x) | |
4 # result might vary |
# get a fresh state without constraints | |
>>> state = proj.factory.entry_state() | |
>>> input = state.solver.BVS('input', 64) | |
>>> operation = (((input + 4) * 3) >> 1) + input | |
>>> output = 200 | |
>>> state.solver.add(operation == output) | |
>>> state.solver.eval(input) | |
0x3333333333333381 | |
>>> state.solver.add(input < 2**32) | |
>>> state.satisfiable() | |
False |
# fresh state | |
>>> state = proj.factory.entry_state() | |
>>> state.solver.add(x - y >= 4) | |
>>> state.solver.add(y > 0) | |
>>> state.solver.eval(x) | |
5 | |
>>> state.solver.eval(y) | |
1 | |
>>> state.solver.eval(x + y) | |
6 |
# Floating point numbers
# fresh state | |
>>> state = proj.factory.entry_state() | |
>>> a = state.solver.FPV(3.2, state.solver.fp.FSORT_DOUBLE) | |
>>> a | |
<FP64 FPV(3.2, DOUBLE)> | |
>>> b = state.solver.FPS('b', state.solver.fp.FSORT_DOUBLE) | |
>>> b | |
<FP64 FPS('FP_b_0_64', DOUBLE)> | |
>>> a + b | |
<FP64 fpAdd('RNE', FPV(3.2, DOUBLE), FPS('FP_b_0_64', DOUBLE))> | |
>>> a + 4.4 | |
<FP64 FPV(7.6000000000000005, DOUBLE)> | |
>>> b + 2 < 0 | |
<Bool fpLT(fpAdd('RNE', FPS('FP_b_0_64', DOUBLE), FPV(2.0, DOUBLE)), FPV(0.0, DOUBLE))> |
This is nice, but sometimes we need to be able to work directly with the representation of the float as a bitvector. You can interpret bitvectors as floats and vice versa, with the methods raw_to_bv and raw_to_fp :
>>> a.raw_to_bv() | |
<BV64 0x400999999999999a> | |
>>> b.raw_to_bv() | |
<BV64 fpToIEEEBV(FPS('FP_b_0_64', DOUBLE))> | |
>>> state.solver.BVV(0, 64).raw_to_fp() | |
<FP64 FPV(0.0, DOUBLE)> | |
>>> state.solver.BVS('x', 64).raw_to_fp() | |
<FP64 fpToFP(x_1_64, DOUBLE)> |
>>> a | |
<FP64 FPV(3.2, DOUBLE)> | |
>>> a.val_to_bv(12) | |
<BV12 0x3> | |
>>> a.val_to_bv(12).val_to_fp(state.solver.fp.FSORT_FLOAT) | |
<FP32 FPV(3.0, FLOAT)> |
# More Solving Methods
eval will give you one possible solution to an expression, but what if you want several? What if you want to ensure that the solution is unique? The solver provides you with several methods for common solving patterns:
solver.eval(expression)will give you one possible solution to the given expression.solver.eval_one(expression)will give you the solution to the given expression, or throw an error if more than one solution is possible.solver.eval_upto(expression, n)will give you up to n solutions to the given expression, returning fewer than n if fewer than n are possible.solver.eval_atleast(expression, n)will give you n solutions to the given expression, throwing an error if fewer than n are possible.solver.eval_exact(expression, n)will give you n solutions to the given expression, throwing an error if fewer or more than are possible.solver.min(expression)will give you the minimum possible solution to the given expression.solver.max(expression)will give you the maximum possible solution to the given expression.
Additionally, all of these methods can take the following keyword arguments:
extra_constraintscan be passed as a tuple of constraints. These constraints will be taken into account for this evaluation, but will not be added to the state.cast_tocan be passed a data type to cast the result to. Currently, this can only beintandbytes, which will cause the method to return the corresponding representation of the underlying data. For example,state.solver.eval(state.solver.BVV(0x41424344, 32), cast_to=bytes)will returnb'ABCD'.
# Machine State - memory, registers, and so on
quick examples:
>>> import angr, claripy | |
>>> proj = angr.Project('/bin/true') | |
>>> state = proj.factory.entry_state() | |
# copy rsp to rbp | |
>>> state.regs.rbp = state.regs.rsp | |
# store rdx to memory at 0x1000 | |
>>> state.mem[0x1000].uint64_t = state.regs.rdx | |
# dereference rbp | |
>>> state.regs.rbp = state.mem[state.regs.rbp].uint64_t.resolved | |
# add rax, qword ptr [rsp + 8] | |
>>> state.regs.rax += state.mem[state.regs.rsp + 8].uint64_t.resolved |
这里开始使用更简单的执行方法: state.step() ,其会进行一步符号执行并且返回名为 angr.engines.successors.SimSuccessors 的对象,并且会提供若干可以被分类成不同执行路径的继承状态,关注该对象的 .successors 属性,其是一个包含所有 “normal” successors of a given step 的 list。
该 list 会包含所有 constraint 的正误状态作为新的 constraint
(这里的 example 应该是用一个 strcmp 作为 constraint)
>>> proj = angr.Project('examples/fauxware/fauxware') | |
>>> state = proj.factory.entry_state(stdin=angr.SimFile) # ignore that argument for now - we're disabling a more complicated default setup for the sake of education | |
>>> while True: | |
... succ = state.step() | |
... if len(succ.successors) == 2: | |
... break | |
... state = succ.successors[0] | |
>>> state1, state2 = succ.successors | |
>>> state1 | |
<SimState @ 0x400629> | |
>>> state2 | |
<SimState @ 0x400699> |
可以 use state.posix.stdin.load(0, state.posix.stdin.size) to retrieve a bitvector representing all the content read from stdin so far
>>> input_data = state1.posix.stdin.load(0, state1.posix.stdin.size) | |
>>> state1.solver.eval(input_data, cast_to=bytes) | |
b'\x00\x00\x00\x00\x00\x00\x00\x00\x00SOSNEAKY\x00\x00\x00' | |
>>> state2.solver.eval(input_data, cast_to=bytes) | |
b'\x00\x00\x00\x00\x00\x00\x00\x00\x00S\x00\x80N\x00\x00 \x00\x00\x00\x00' |
# State Presets
project.factory.
.blank_state()constructs a “blank slate” blank state, with most of its data left uninitialized. When accessing uninitialized data, an unconstrained symbolic value will be returned..entry_state()constructs a state ready to execute at the main binary’s entry point..full_init_state()constructs a state that is ready to execute through any initializers that need to be run before the main binary’s entry point, for example, shared library constructors or preinitializers. When it is finished with these it will jump to the entry point..call_state()constructs a state ready to execute a given function.
使用方法:
- 传入起始地址:
All of these constructors can take an addr argument to specify the exact address to start.
- 传入参数:
If you’re executing in an environment that can take command line arguments or an environment, you can pass a list of arguments through args and a dictionary of environment variables through env into entry_state and full_init_state . The values in these structures can be strings or bitvectors, and will be serialized into the state as the arguments and environment to the simulated execution. The default args is an empty list, so if the program you’re analyzing expects to find at least an argv[0] , you should always provide that!
- 可以传入符号
If you’d like to have argc be symbolic, you can pass a symbolic bitvector as argc to the entry_state and full_init_state constructors. Be careful, though: if you do this, you should also add a constraint to the resulting state that your value for argc cannot be larger than the number of args you passed into args .
- 传入函数参数
To use the call state, you should call it with .call_state(addr, arg1, arg2, ...) , where addr is the address of the function you want to call and argN is the Nth argument to that function, either as a Python integer, string, or array, or a bitvector. If you want to have memory allocated and actually pass in a pointer to an object, you should wrap it in an PointerWrapper, i.e. angr.PointerWrapper("point to me!") . The results of this API can be a little unpredictable, but we’re working on it.
To specify the calling convention used for a function with call_state , you can pass a SimCC instance as the cc argument.:raw-html-m2r: We try to pick a sane default, but for special cases you will need to help angr out.
# 对内存操作
对内存地址批量操作
>>> s = proj.factory.blank_state() | |
>>> s.memory.store(0x4000, s.solver.BVV(0x0123456789abcdef0123456789abcdef, 128)) | |
>>> s.memory.load(0x4004, 6) # load-size is in bytes | |
<BV48 0x89abcdef0123> | |
>>> import archinfo | |
>>> s.memory.load(0x4000, 4, endness=archinfo.Endness.LE) # 小端序存储 | |
<BV32 0x67452301> |
# 对寄存器操作
state.registers : Intermediate Representation - angr documentation
angr/archinfo: Classes with architecture-specific information useful to other projects. (github.com)
# State Options
https://docs.angr.io/en/latest/appendix/options.html#list-of-state-options
# Example: enable lazy solves, an option that causes state satisfiability to be checked as infrequently as possible. | |
# This change to the settings will be propagated to all successor states created from this state after this line. | |
>>> s.options.add(angr.options.LAZY_SOLVES) | |
# Create a new state with lazy solves enabled | |
>>> s = proj.factory.entry_state(add_options={angr.options.LAZY_SOLVES}) | |
# Create a new state without simplification options enabled | |
>>> s = proj.factory.entry_state(remove_options=angr.options.simplification) |
# Plugins
# State Plugins
implement new kinds of data storage
For example, the normal memory plugin simulates a flat memory space, but analyses can choose to enable the “abstract memory” plugin, which uses alternate data types for addresses to simulate free-floating memory mappings independent of address, to provide state.memory . Conversely, plugins can reduce code complexity: state.memory and state.registers are actually two different instances of the same plugin, since the registers are emulated with an address space as well.
# The globals plugin
state.globals is an extremely simple plugin: it implements the interface of a standard Python dict, allowing you to store arbitrary data on a state.
# The history plugin
state.history is a very important plugin storing historical data about the path a state has taken during execution. It is actually a linked list of several history nodes, each one representing a single round of execution—you can traverse this list with state.history.parent.parent etc.
To make it more convenient to work with this structure, the history also provides several efficient iterators over the history of certain values. In general, these values are stored as history.recent_NAME and the iterator over them is just history.NAME . For example, for addr in state.history.bbl_addrs: print hex(addr) will print out a basic block address trace for the binary, while state.history.recent_bbl_addrs is the list of basic blocks executed in the most recent step, state.history.parent.recent_bbl_addrs is the list of basic blocks executed in the previous step, etc. If you ever need to quickly obtain a flat list of these values, you can access .hardcopy , e.g. state.history.bbl_addrs.hardcopy . Keep in mind though, index-based accessing is implemented on the iterators.
Here is a brief listing of some of the values stored in the history:
history.descriptionsis a listing of string descriptions of each of the rounds of execution performed on the state.history.bbl_addrsis a listing of the basic block addresses executed by the state. There may be more than one per round of execution, and not all addresses may correspond to binary code - some may be addresses at which SimProcedures are hooked.history.jumpkindsis a listing of the disposition of each of the control flow transitions in the state’s history, as VEX enum strings.history.jump_guardsis a listing of the conditions guarding each of the branches that the state has encountered.history.eventsis a semantic listing of “interesting events” which happened during execution, such as the presence of a symbolic jump condition, the program popping up a message box, or execution terminating with an exit code.history.actionsis usually empty, but if you add theangr.options.refsoptions to the state, it will be populated with a log of all the memory, register, and temporary value accesses performed by the program.
# The callstack plugin
angr will track the call stack for the emulated program. On every call instruction, a frame will be added to the top of the tracked callstack, and whenever the stack pointer drops below the point where the topmost frame was called, a frame is popped. This allows angr to robustly store data local to the current emulated function.
Similar to the history, the callstack is also a linked list of nodes, but there are no provided iterators over the contents of the nodes - instead you can directly iterate over state.callstack to get the callstack frames for each of the active frames, in order from most recent to oldest. If you just want the topmost frame, this is state.callstack .
callstack.func_addris the address of the function currently being executedcallstack.call_site_addris the address of the basic block which called the current functioncallstack.stack_ptris the value of the stack pointer from the beginning of the current functioncallstack.ret_addris the location that the current function will return to if it returns
# I/O
Working with File System, Sockets, and Pipes
# Copying and Merging
A state supports very fast copies, so that you can explore different possibilities:
>>> proj = angr.Project('/bin/true') | |
>>> s = proj.factory.blank_state() | |
>>> s1 = s.copy() | |
>>> s2 = s.copy() | |
>>> s1.mem[0x1000].uint32_t = 0x41414141 | |
>>> s2.mem[0x1000].uint32_t = 0x42424242 |
States can also be merged together.
# merge will return a tuple. the first element is the merged state | |
# the second element is a symbolic variable describing a state flag | |
# the third element is a boolean describing whether any merging was done | |
>>> (s_merged, m, anything_merged) = s1.merge(s2) | |
# this is now an expression that can resolve to "AAAA" *or* "BBBB" | |
>>> aaaa_or_bbbb = s_merged.mem[0x1000].uint32_t | |
print(aaaa_or_bbbb) | |
# 打印该地址可能的数值集合 | |
# <uint32_t <BV32 (if state_merge_0_0_16 == 0x1 then 66 else (if state_merge_0_0_16 == 0x0 then 65 else 0)) .. (if state_merge_0_0_16 == 0x1 then 66 else (if state_merge_0_0_16 == 0x0 then 65 else 0)) .. (if state_merge_0_0_16 == 0x1 then 66 else (if state_merge_0_0_16 == 0x0 then 65 else 0)) .. (if state_merge_0_0_16 == 0x1 then 66 else (if state_merge_0_0_16 == 0x0 then 65 else 0))> at 0x1000> |
# Simulation Managers
描述:
Simulation managers let you wrangle multiple states in a slick way. States are organized into “stashes”, which you can step forward, filter, merge, and move around as you wish.
# Stepping
.step() : 前进一个 basic block
.run() :执行到所有 deadended,并且获得所有 deadended states(例如到达 exit syscall,此时该 state 会被从 active stash 中移除并放入 deadended states )
# Stash Management
.move() : from_stash to_stash filter_func (optional, default:everything)
# eg. 检查所有执行路径已终止(deadended)的状态,查找其中在程序的标准输出中打印了 'Welcome' 的状态,并将这些状态移动到一个名为 'authenticated' 的新 stash,以便进一步分析或单独处理。 | |
simgr.move(from_stash='deadended', to_stash='authenticated', filter_func=lambda s: b'Welcome' in s.posix.dumps(1)) | |
>>> simgr | |
<SimulationManager with 2 authenticated, 1 deadended> |
stash 的类型为 list,可以通过如下方式访问:
for s in simgr.deadended + simgr.authenticated: | |
... print(hex(s.addr)) | |
0x1000030 | |
0x1000078 | |
0x1000078 | |
>>> simgr.one_deadended | |
<SimState @ 0x1000030> | |
>>> simgr.mp_authenticated | |
MP([<SimState @ 0x1000078>, <SimState @ 0x1000078>]) | |
>>> simgr.mp_authenticated.posix.dumps(0) | |
MP(['\x00\x00\x00\x00\x00\x00\x00\x00\x00SOSNEAKY\x00', | |
'\x00\x00\x00\x00\x00\x00\x00\x00\x00S\x80\x80\x80\x80@\x80@\x00']) |
所以 link 呢

# Stash types
| Stash | Description |
|---|---|
| active | This stash contains the states that will be stepped by default, unless an alternate stash is specified. |
| deadended | A state goes to the deadended stash when it cannot continue the execution for some reason, including no more valid instructions, unsat state of all of its successors, or an invalid instruction pointer. |
| pruned | When using LAZY_SOLVES , states are not checked for satisfiability unless absolutely necessary. When a state is found to be unsat in the presence of LAZY_SOLVES , the state hierarchy is traversed to identify when, in its history, it initially became unsat. All states that are descendants of that point (which will also be unsat, since a state cannot become un-unsat) are pruned and put in this stash. |
| unconstrained | If the save_unconstrained option is provided to the SimulationManager constructor, states that are determined to be unconstrained (i.e., with the instruction pointer controlled by user data or some other source of symbolic data) are placed here. |
| unsat | If the save_unsat option is provided to the SimulationManager constructor, states that are determined to be unsatisfiable (i.e., they have constraints that are contradictory, like the input having to be both “AAAA” and “BBBB” at the same time) are placed here. |
| errored | If, during execution, an error is raised, then the state will be wrapped in an ErrorRecord object, which contains the state and the error it raised, and then the record will be inserted into errored . launch a debug shell at the site of the error with record.debug() . |
# Exploration
.explore() : find argument (指令的结束地址或结束地址列表,或函数根据某种标准的返回状态)
当满足后,放入 found stash,然后结束符号执行,可以同样声明 avoid condition(格式与 find 相同)
num_find 指定 return 前找到多少数量的 find (default = 1,如果所有 active stash 的 state 被全部执行则同样 return)
eg.
proj = angr.Project('examples/CSCI-4968-MBE/challenges/crackme0x00a/crackme0x00a') | |
simgr = proj.factory.simgr() | |
simgr.explore(find=lambda s: b"Congrats" in s.posix.dumps(1)) | |
s = simgr.found[0] | |
print(s.posix.dumps(1)) | |
# Enter password: Congrats! | |
flag = s.posix.dumps(0) | |
print(flag) | |
# g00dJ0B! |
其他样例:angr examples - angr documentation
# Exploration Techniques
angr ships with several pieces of canned functionality that let you customize the behavior of a simulation manager, called exploration techniques. The archetypical example of why you would want an exploration technique is to modify the pattern in which the state space of the program is explored - the default “step everything at once” strategy is effectively breadth-first search, but with an exploration technique you could implement, for example, depth-first search. However, the instrumentation power of these techniques is much more flexible than that - you can totally alter the behavior of angr’s stepping process. Writing your own exploration techniques will be covered in a later chapter.
To use an exploration technique, call simgr.use_technique(tech) , where tech is an instance of an ExplorationTechnique subclass. angr’s built-in exploration techniques can be found under angr.exploration_techniques .
Here’s a quick overview of some of the built-in ones:
- DFS: Depth first search, as mentioned earlier. Keeps only one state active at once, putting the rest in the
deferredstash until it deadends or errors. - Explorer: This technique implements the
.explore()functionality, allowing you to search for and avoid addresses. - LengthLimiter: Puts a cap on the maximum length of the path a state goes through.
- LoopSeer: Uses a reasonable approximation of loop counting to discard states that appear to be going through a loop too many times, putting them in a
spinningstash and pulling them out again if we run out of otherwise viable states. - ManualMergepoint: Marks an address in the program as a merge point, so states that reach that address will be briefly held, and any other states that reach that same point within a timeout will be merged together.
- MemoryWatcher: Monitors how much memory is free/available on the system between simgr steps and stops exploration if it gets too low.
- Oppologist: The “operation apologist” is an especially fun gadget - if this technique is enabled and angr encounters an unsupported instruction, for example a bizzare and foreign floating point SIMD op, it will concretize all the inputs to that instruction and emulate the single instruction using the unicorn engine, allowing execution to continue.
- Spiller: When there are too many states active, this technique can dump some of them to disk in order to keep memory consumption low.
- Threading: Adds thread-level parallelism to the stepping process. This doesn’t help much because of Python’s global interpreter locks, but if you have a program whose analysis spends a lot of time in angr’s native-code dependencies (unicorn, z3, libvex) you can seem some gains.
- Tracer: An exploration technique that causes execution to follow a dynamic trace recorded from some other source. The dynamic tracer repository has some tools to generate those traces.
- Veritesting: An implementation of a [CMU paper](https://users.ece.cmu.edu/~dbrumley/pdf/Avgerinos et al._2014_Enhancing Symbolic Execution with Veritesting.pdf) on automatically identifying useful merge points. This is so useful, you can enable it automatically with
veritesting=Truein the SimulationManager constructor! Note that it frequenly doesn’t play nice with other techniques due to the invasive way it implements static symbolic execution.
Look at the API documentation for the SimulationManager and ExplorationTechnique classes for more information.
# Simulation and Instrumentation
| Attribute | Guard Condition | Instruction Pointer | Description |
|---|---|---|---|
successors |
True (can be symbolic, but constrained to True) | Can be symbolic (but 256 solutions or less; see unconstrained_successors ). |
A normal, satisfiable successor state to the state processed by the engine. The instruction pointer of this state may be symbolic (i.e., a computed jump based on user input), so the state might actually represent several potential continuations of execution going forward. |
unsat_successors |
False (can be symbolic, but constrained to False). | Can be symbolic. | Unsatisfiable successors. These are successors whose guard conditions can only be false (i.e., jumps that cannot be taken, or the default branch of jumps that must be taken). |
flat_successors |
True (can be symbolic, but constrained to True). | Concrete value. | As noted above, states in the successors list can have symbolic instruction pointers. This is rather confusing, as elsewhere in the code (i.e., in SimEngineVEX.process , when it’s time to step that state forward), we make assumptions that a single program state only represents the execution of a single spot in the code. To alleviate this, when we encounter states in successors with symbolic instruction pointers, we compute all possible concrete solutions (up to an arbitrary threshold of 256) for them, and make a copy of the state for each such solution. We call this process “flattening”. These flat_successors are states, each of which has a different, concrete instruction pointer. For example, if the instruction pointer of a state in successors was X+5 , where X had constraints of X > 0x800000 and X <= 0x800010 , we would flatten it into 16 different flat_successors states, one with an instruction pointer of 0x800006 , one with 0x800007 , and so on until 0x800015 . |
unconstrained_successors |
True (can be symbolic, but constrained to True). | Symbolic (with more than 256 solutions). | During the flattening procedure described above, if it turns out that there are more than 256 possible solutions for the instruction pointer, we assume that the instruction pointer has been overwritten with unconstrained data (i.e., a stack overflow with user data). This assumption is not sound in general. Such states are placed in unconstrained_successors and not in successors . |
all_successors |
Anything | Can be symbolic. | This is successors + unsat_successors + unconstrained_successors . |
# Breakpoints
>>> import angr | |
>>> b = angr.Project('examples/fauxware/fauxware') | |
# get our state | |
>>> s = b.factory.entry_state() | |
# add a breakpoint. This breakpoint will drop into ipdb right before a memory write happens. | |
>>> s.inspect.b('mem_write') | |
# on the other hand, we can have a breakpoint trigger right *after* a memory write happens. | |
# we can also have a callback function run instead of opening ipdb. | |
>>> def debug_func(state): | |
... print("State %s is about to do a memory write!") | |
>>> s.inspect.b('mem_write', when=angr.BP_AFTER, action=debug_func) | |
# or, you can have it drop you in an embedded IPython! | |
>>> s.inspect.b('mem_write', when=angr.BP_AFTER, action=angr.BP_IPYTHON) |
| Event type | Event meaning |
|---|---|
| mem_read | Memory is being read. |
| mem_write | Memory is being written. |
| address_concretization | A symbolic memory access is being resolved. |
| reg_read | A register is being read. |
| reg_write | A register is being written. |
| tmp_read | A temp is being read. |
| tmp_write | A temp is being written. |
| expr | An expression is being created (i.e., a result of an arithmetic operation or a constant in the IR). |
| statement | An IR statement is being translated. |
| instruction | A new (native) instruction is being translated. |
| irsb | A new basic block is being translated. |
| constraints | New constraints are being added to the state. |
| exit | A successor is being generated from execution. |
| fork | A symbolic execution state has forked into multiple states. |
| symbolic_variable | A new symbolic variable is being created. |
| call | A call instruction is hit. |
| return | A ret instruction is hit. |
| simprocedure | A simprocedure (or syscall) is executed. |
| dirty | A dirty IR callback is executed. |
| syscall | A syscall is executed (called in addition to the simprocedure event). |
| engine_process | A SimEngine is about to process some code. |
These events expose different attributes:
| Event type | Attribute name | Attribute availability | Attribute meaning |
|---|---|---|---|
| mem_read | mem_read_address | BP_BEFORE or BP_AFTER | The address at which memory is being read. |
| mem_read | mem_read_expr | BP_AFTER | The expression at that address. |
| mem_read | mem_read_length | BP_BEFORE or BP_AFTER | The length of the memory read. |
| mem_read | mem_read_condition | BP_BEFORE or BP_AFTER | The condition of the memory read. |
| mem_write | mem_write_address | BP_BEFORE or BP_AFTER | The address at which memory is being written. |
| mem_write | mem_write_length | BP_BEFORE or BP_AFTER | The length of the memory write. |
| mem_write | mem_write_expr | BP_BEFORE or BP_AFTER | The expression that is being written. |
| mem_write | mem_write_condition | BP_BEFORE or BP_AFTER | The condition of the memory write. |
| reg_read | reg_read_offset | BP_BEFORE or BP_AFTER | The offset of the register being read. |
| reg_read | reg_read_length | BP_BEFORE or BP_AFTER | The length of the register read. |
| reg_read | reg_read_expr | BP_AFTER | The expression in the register. |
| reg_read | reg_read_condition | BP_BEFORE or BP_AFTER | The condition of the register read. |
| reg_write | reg_write_offset | BP_BEFORE or BP_AFTER | The offset of the register being written. |
| reg_write | reg_write_length | BP_BEFORE or BP_AFTER | The length of the register write. |
| reg_write | reg_write_expr | BP_BEFORE or BP_AFTER | The expression that is being written. |
| reg_write | reg_write_condition | BP_BEFORE or BP_AFTER | The condition of the register write. |
| tmp_read | tmp_read_num | BP_BEFORE or BP_AFTER | The number of the temp being read. |
| tmp_read | tmp_read_expr | BP_AFTER | The expression of the temp. |
| tmp_write | tmp_write_num | BP_BEFORE or BP_AFTER | The number of the temp written. |
| tmp_write | tmp_write_expr | BP_AFTER | The expression written to the temp. |
| expr | expr | BP_BEFORE or BP_AFTER | The IR expression. |
| expr | expr_result | BP_AFTER | The value (e.g. AST) which the expression was evaluated to. |
| statement | statement | BP_BEFORE or BP_AFTER | The index of the IR statement (in the IR basic block). |
| instruction | instruction | BP_BEFORE or BP_AFTER | The address of the native instruction. |
| irsb | address | BP_BEFORE or BP_AFTER | The address of the basic block. |
| constraints | added_constraints | BP_BEFORE or BP_AFTER | The list of constraint expressions being added. |
| call | function_address | BP_BEFORE or BP_AFTER | The name of the function being called. |
| exit | exit_target | BP_BEFORE or BP_AFTER | The expression representing the target of a SimExit. |
| exit | exit_guard | BP_BEFORE or BP_AFTER | The expression representing the guard of a SimExit. |
| exit | exit_jumpkind | BP_BEFORE or BP_AFTER | The expression representing the kind of SimExit. |
| symbolic_variable | symbolic_name | BP_AFTER | The name of the symbolic variable being created. The solver engine might modify this name (by appending a unique ID and length). Check the symbolic_expr for the final symbolic expression. |
| symbolic_variable | symbolic_size | BP_AFTER | The size of the symbolic variable being created. |
| symbolic_variable | symbolic_expr | BP_AFTER | The expression representing the new symbolic variable. |
| address_concretization | address_concretization_strategy | BP_BEFORE or BP_AFTER | The SimConcretizationStrategy being used to resolve the address. This can be modified by the breakpoint handler to change the strategy that will be applied. If your breakpoint handler sets this to None, this strategy will be skipped. |
| address_concretization | address_concretization_action | BP_BEFORE or BP_AFTER | The SimAction object being used to record the memory action. |
| address_concretization | address_concretization_memory | BP_BEFORE or BP_AFTER | The SimMemory object on which the action was taken. |
| address_concretization | address_concretization_expr | BP_BEFORE or BP_AFTER | The AST representing the memory index being resolved. The breakpoint handler can modify this to affect the address being resolved. |
| address_concretization | address_concretization_add_constraints | BP_BEFORE or BP_AFTER | Whether or not constraints should/will be added for this read. |
| address_concretization | address_concretization_result | BP_AFTER | The list of resolved memory addresses (integers). The breakpoint handler can overwrite these to effect a different resolution result. |
| syscall | syscall_name | BP_BEFORE or BP_AFTER | The name of the system call. |
| simprocedure | simprocedure_name | BP_BEFORE or BP_AFTER | The name of the simprocedure. |
| simprocedure | simprocedure_addr | BP_BEFORE or BP_AFTER | The address of the simprocedure. |
| simprocedure | simprocedure_result | BP_AFTER | The return value of the simprocedure. You can also override it in BP_BEFORE, which will cause the actual simprocedure to be skipped and for your return value to be used instead. |
| simprocedure | simprocedure | BP_BEFORE or BP_AFTER | The actual SimProcedure object. |
| dirty | dirty_name | BP_BEFORE or BP_AFTER | The name of the dirty call. |
| dirty | dirty_handler | BP_BEFORE | The function that will be run to handle the dirty call. You can override this. |
| dirty | dirty_args | BP_BEFORE or BP_AFTER | The address of the dirty. |
| dirty | dirty_result | BP_AFTER | The return value of the dirty call. You can also override it in BP_BEFORE, which will cause the actual dirty call to be skipped and for your return value to be used instead. |
| engine_process | sim_engine | BP_BEFORE or BP_AFTER | The SimEngine that is processing. |
| engine_process | successors | BP_BEFORE or BP_AFTER | The SimSuccessors object defining the result of the engine. |
eg. 每当程序状态 s 执行内存读取时, angr 都会在读取完成后立即调用 track_reads ,打印出读取的值和发生读取的内存地址。
>>> def track_reads(state): | |
... print('Read', state.inspect.mem_read_expr, 'from', state.inspect.mem_read_address) | |
... | |
>>> s.inspect.b('mem_read', when=angr.BP_AFTER, action=track_reads) |
# This will break before a memory write if 0x1000 is a possible value of its target expression | |
>>> s.inspect.b('mem_write', mem_write_address=0x1000) | |
# This will break before a memory write if 0x1000 is the *only* value of its target expression | |
>>> s.inspect.b('mem_write', mem_write_address=0x1000, mem_write_address_unique=True) | |
# This will break after instruction 0x8000, but only 0x1000 is a possible value of the last expression that was read from memory | |
>>> s.inspect.b('instruction', when=angr.BP_AFTER, instruction=0x8000, mem_read_expr=0x1000) |
声明函数作为 condition
# this is a complex condition that could do anything! In this case, it makes sure that RAX is 0x41414141 and | |
# that the basic block starting at 0x8004 was executed sometime in this path's history | |
>>> def cond(state): | |
... return state.eval(state.regs.rax, cast_to=str) == 'AAAA' and 0x8004 in state.inspect.backtrace | |
>>> s.inspect.b('mem_write', condition=cond) |
# Caution about mem_read breakpoint
The mem_read breakpoint gets triggered anytime there are memory reads by either the executing program or the binary analysis. If you are using breakpoint on mem_read and also using state.mem to load data from memory addresses, then know that the breakpoint will be fired as you are technically reading memory.
So if you want to load data from memory and not trigger any mem_read breakpoint you have had set up, then use state.memory.load with the keyword arguments disable_actions=True and inspect=False .
This is also true for state.find and you can use the same keyword arguments to prevent mem_read breakpoints from firing.
# Analyses
Writing Analyses - angr documentation
the idea is that all the analyses appear under project.analyses (for example, project.analyses.CFGFast() ) and can be called as functions, returning analysis result instances.
| Name | Description |
|---|---|
| CFGFast | Constructs a fast Control Flow Graph of the program |
| CFGEmulated | Constructs an accurate Control Flow Graph of the program |
| VFG | Performs VSA on every function of the program, creating a Value Flow Graph and detecting stack variables |
| DDG | Calculates a Data Dependency Graph, allowing one to determine what statements a given value depends on |
| BackwardSlice | Computes a Backward Slice of a program with respect to a certain target |
| Identifier | Identifies common library functions in CGC binaries |
| More! | angr has quite a few analyses, most of which work! If you’d like to know how to use one, please submit an issue requesting documentation. |
# Resilience
Analyses can be written to be resilient, and catch and log basically any error. These errors, depending on how they’re caught, are logged to the errors or named_errors attribute of the analysis. However, you might want to run an analysis in “fail fast” mode, so that errors are not handled. To do this, the argument fail_fast=True can be passed into the analysis constructor.
# Symbolic Execution
# 为什么这里是 todo…
Symbolic Execution - angr documentation
# angr_ctf
# 官方给的样例,文档里还有很多真实 ctf 比赛的例题 orz,初探就做到这里吧
# 环境配置
添加环境变量:
export C_INCLUDE_PATH=/usr/include/x86_64-linux-gnu
支持编译 32 位程序包:
sudo apt-get install libc6-dev-i386
生成可执行程序
python3 generate.py [seed] [output_file]
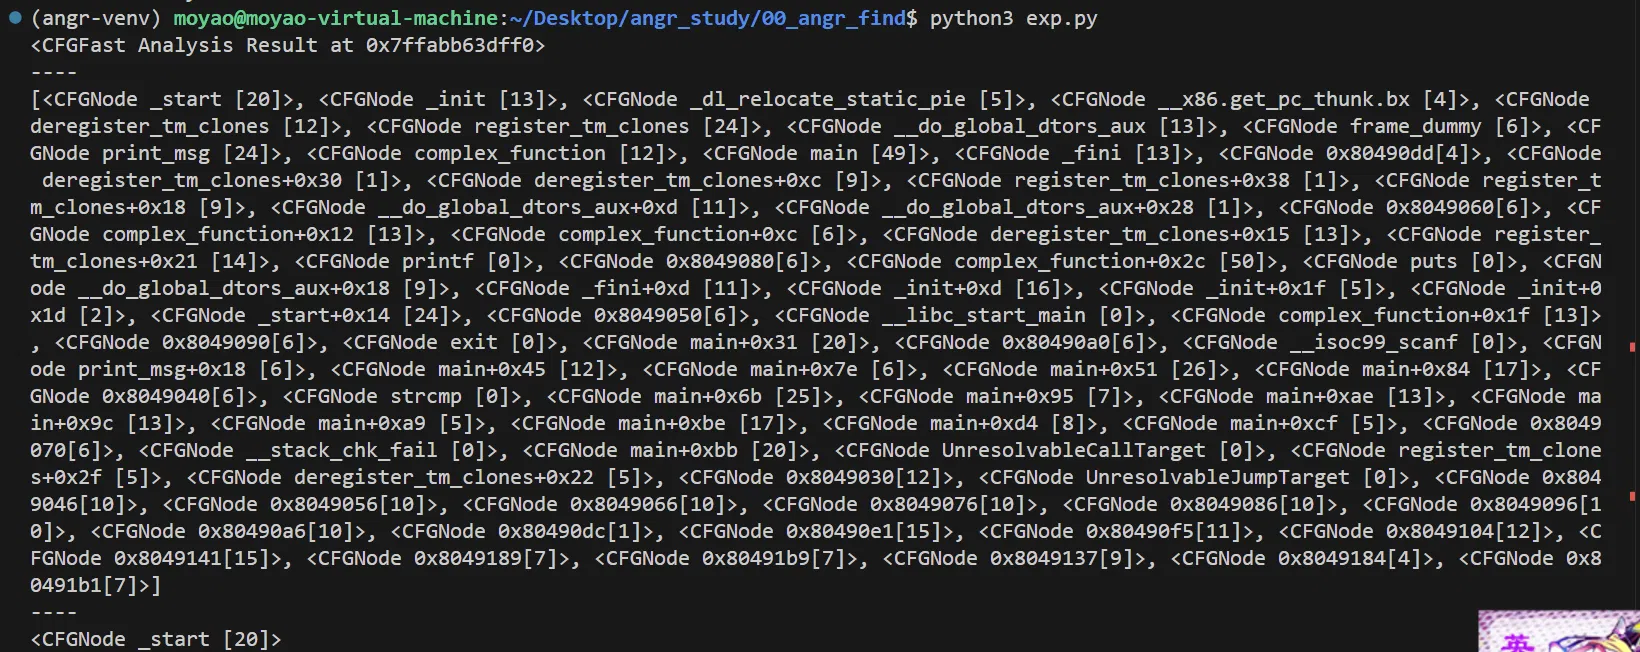
# 00_angr_find
直接找对应标准输出的输入即可
import angr | |
proj = angr.Project('./angr', auto_load_libs=False) | |
simgr = proj.factory.simgr() | |
simgr.explore(find=lambda s: b"Good Job." in s.posix.dumps(1)) | |
s = simgr.found[0] | |
flag = s.posix.dumps(0) | |
print(flag) |
# 01_angr_avoid
main 函数的节点过多
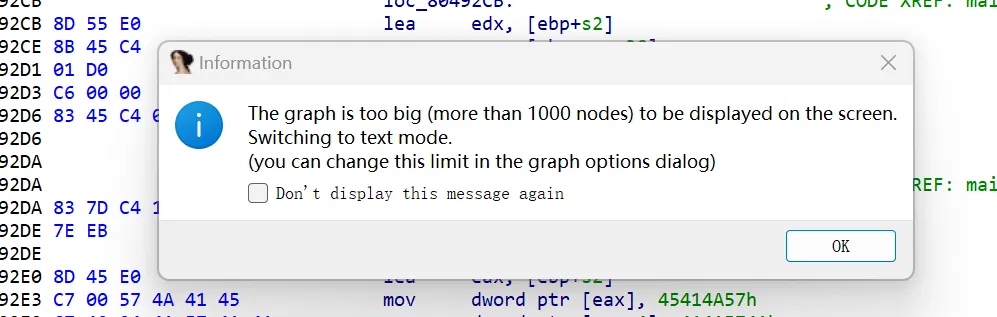
可以看到 avoid_me 函数被大量调用
这里需要让 angr 走到 avoid_me 函数后就剪枝
可以使用函数传入所有需要 avoid 的状态
import angr | |
proj = angr.Project('./angr', auto_load_libs=False) | |
simgr = proj.factory.simgr() | |
def should_avoid(state): | |
# 检查输出是否包含 "Try again" | |
if b"Try again" in state.posix.dumps(1): | |
return True | |
# 检查当前地址是否是我们想要避免的地址 | |
if state.addr == 0x8049243: | |
return True | |
# 如果以上条件都不满足,那么我们不避免这个状态 | |
return False | |
simgr.explore(find = lambda s1: b"Good Job." in s1.posix.dumps(1), avoid = should_avoid) | |
s = simgr.found[0] | |
flag = s.posix.dumps(0) | |
print(flag) |
# 02_angr_find_condition
和上面一样
import angr | |
proj = angr.Project('./angr', auto_load_libs=False) | |
simgr = proj.factory.simgr() | |
def should_avoid(state): | |
if b"Try again." in state.posix.dumps(1): | |
return True | |
return False | |
simgr.explore(find = lambda s1: b"Good Job." in s1.posix.dumps(1), avoid = should_avoid) | |
s = simgr.found[0] | |
flag = s.posix.dumps(0) | |
print(flag) |
# 03_angr_symbolic_registers
和上面一样可以打通
import angr | |
proj = angr.Project('./angr', auto_load_libs=False) | |
simgr = proj.factory.simgr() | |
def should_avoid(state): | |
# 检查输出是否包含 "Try again" | |
if b"Try again" in state.posix.dumps(1): | |
return True | |
return False | |
simgr.explore(find = lambda s1: b"Good Job." in s1.posix.dumps(1), avoid = should_avoid) | |
s = simgr.found[0] | |
flag = s.posix.dumps(0) | |
print(flag) |
不过官方 exp 是打算让分段打(yysy,看起来没啥用,也就是省去了初始化的一些时间,不会优化太多):
# Angr doesn't currently support reading multiple things with scanf (Ex: | |
# scanf("%u %u).) You will have to tell the simulation engine to begin the | |
# program after scanf is called and manually inject the symbols into registers. | |
import angr | |
import claripy | |
import sys | |
def main(argv): | |
path_to_binary = argv[1] | |
project = angr.Project(path_to_binary) | |
# Sometimes, you want to specify where the program should start. The variable | |
# start_address will specify where the symbolic execution engine should begin. | |
# Note that we are using blank_state, not entry_state. | |
# (!) | |
start_address = 0x80488c7 # :integer (probably hexadecimal) | |
initial_state = project.factory.blank_state( | |
addr=start_address, | |
add_options = { angr.options.SYMBOL_FILL_UNCONSTRAINED_MEMORY, | |
angr.options.SYMBOL_FILL_UNCONSTRAINED_REGISTERS} | |
) | |
# Create a symbolic bitvector (the datatype Angr uses to inject symbolic | |
# values into the binary.) The first parameter is just a name Angr uses | |
# to reference it. | |
# You will have to construct multiple bitvectors. Copy the two lines below | |
# and change the variable names. To figure out how many (and of what size) | |
# you need, dissassemble the binary and determine the format parameter passed | |
# to scanf. | |
# (!) | |
password0_size_in_bits = 32 # :integer | |
password0 = claripy.BVS('password0', password0_size_in_bits) | |
password1_size_in_bits = 32 # :integer | |
password1 = claripy.BVS('password1', password1_size_in_bits) | |
password2_size_in_bits = 32 # :integer | |
password2 = claripy.BVS('password2', password2_size_in_bits) | |
# Set a register to a symbolic value. This is one way to inject symbols into | |
# the program. | |
# initial_state.regs stores a number of convenient attributes that reference | |
# registers by name. For example, to set eax to password0, use: | |
# | |
# initial_state.regs.eax = password0 | |
# | |
# You will have to set multiple registers to distinct bitvectors. Copy and | |
# paste the line below and change the register. To determine which registers | |
# to inject which symbol, dissassemble the binary and look at the instructions | |
# immediately following the call to scanf. | |
# (!) | |
initial_state.regs.eax = password0 | |
initial_state.regs.ebx = password1 | |
initial_state.regs.edx = password2 | |
simulation = project.factory.simgr(initial_state) | |
def is_successful(state): | |
stdout_output = state.posix.dumps(sys.stdout.fileno()) | |
return 'Good Job.'.encode() in stdout_output | |
def should_abort(state): | |
stdout_output = state.posix.dumps(sys.stdout.fileno()) | |
return 'Try again.'.encode() in stdout_output | |
simulation.explore(find=is_successful, avoid=should_abort) | |
if simulation.found: | |
solution_state = simulation.found[0] | |
# Solve for the symbolic values. If there are multiple solutions, we only | |
# care about one, so we can use eval, which returns any (but only one) | |
# solution. Pass eval the bitvector you want to solve for. | |
# (!) | |
solution0 = solution_state.solver.eval(password0) | |
solution1 = solution_state.solver.eval(password1) | |
solution2 = solution_state.solver.eval(password2) | |
# Aggregate and format the solutions you computed above, and then print | |
# the full string. Pay attention to the order of the integers, and the | |
# expected base (decimal, octal, hexadecimal, etc). | |
solution = ' '.join(map('{:x}'.format, [ solution0, solution1, solution2 ])) # :string | |
print(solution) | |
else: | |
raise Exception('Could not find the solution') | |
if __name__ == '__main__': | |
main(sys.argv) |
# 04_angr_symbolic_stack
老 exp 还是可以打通… 不过官方 exp 是要求把栈模拟一下的,贴一下先
# This challenge will be more challenging than the previous challenges that you | |
# have encountered thus far. Since the goal of this CTF is to teach symbolic | |
# execution and not how to construct stack frames, these comments will work you | |
# through understanding what is on the stack. | |
# ! ! ! | |
# IMPORTANT: Any addresses in this script aren't necessarily right! Dissassemble | |
# the binary yourself to determine the correct addresses! | |
# ! ! ! | |
import angr | |
import claripy | |
import sys | |
def main(argv): | |
path_to_binary = argv[1] | |
project = angr.Project(path_to_binary) | |
# For this challenge, we want to begin after the call to scanf. Note that this | |
# is in the middle of a function. | |
# | |
# This challenge requires dealing with the stack, so you have to pay extra | |
# careful attention to where you start, otherwise you will enter a condition | |
# where the stack is set up incorrectly. In order to determine where after | |
# scanf to start, we need to look at the dissassembly of the call and the | |
# instruction immediately following it: | |
# sub $0x4,%esp | |
# lea -0x10(%ebp),%eax | |
# push %eax | |
# lea -0xc(%ebp),%eax | |
# push %eax | |
# push $0x80489c3 | |
# call 8048370 <__isoc99_scanf@plt> | |
# add $0x10,%esp | |
# Now, the question is: do we start on the instruction immediately following | |
# scanf (add $0x10,%esp), or the instruction following that (not shown)? | |
# Consider what the 'add $0x10,%esp' is doing. Hint: it has to do with the | |
# scanf parameters that are pushed to the stack before calling the function. | |
# Given that we are not calling scanf in our Angr simulation, where should we | |
# start? | |
# (!) | |
start_address = 0x80486ae | |
initial_state = project.factory.blank_state( | |
addr=start_address, | |
add_options = { angr.options.SYMBOL_FILL_UNCONSTRAINED_MEMORY, | |
angr.options.SYMBOL_FILL_UNCONSTRAINED_REGISTERS} | |
) | |
# We are jumping into the middle of a function! Therefore, we need to account | |
# for how the function constructs the stack. The second instruction of the | |
# function is: | |
# mov %esp,%ebp | |
# At which point it allocates the part of the stack frame we plan to target: | |
# sub $0x18,%esp | |
# Note the value of esp relative to ebp. The space between them is (usually) | |
# the stack space. Since esp was decreased by 0x18 | |
# | |
# /-------- The stack --------\ | |
# ebp -> | | | |
# |---------------------------| | |
# | | | |
# |---------------------------| | |
# . . . (total of 0x18 bytes) | |
# . . . Somewhere in here is | |
# . . . the data that stores | |
# . . . the result of scanf. | |
# esp -> | | | |
# \---------------------------/ | |
# | |
# Since we are starting after scanf, we are skipping this stack construction | |
# step. To make up for this, we need to construct the stack ourselves. Let us | |
# start by initializing ebp in the exact same way the program does. | |
initial_state.regs.ebp = initial_state.regs.esp | |
# scanf("%u %u") needs to be replaced by injecting two bitvectors. The | |
# reason for this is that Angr does not (currently) automatically inject | |
# symbols if scanf has more than one input parameter. This means Angr can | |
# handle 'scanf("%u")', but not 'scanf("%u %u")'. | |
# You can either copy and paste the line below or use a Python list. | |
# (!) | |
password0 = claripy.BVS('password0', 32) | |
password1 = claripy.BVS('password1', 32) | |
# Here is the hard part. We need to figure out what the stack looks like, at | |
# least well enough to inject our symbols where we want them. In order to do | |
# that, let's figure out what the parameters of scanf are: | |
# sub $0x4,%esp | |
# lea -0x10(%ebp),%eax | |
# push %eax | |
# lea -0xc(%ebp),%eax | |
# push %eax | |
# push $0x80489c3 | |
# call 8048370 <__isoc99_scanf@plt> | |
# add $0x10,%esp | |
# As you can see, the call to scanf looks like this: | |
# scanf( 0x80489c3, ebp - 0xc, ebp - 0x10 ) | |
# format_string password0 password1 | |
# From this, we can construct our new, more accurate stack diagram: | |
# | |
# /-------- The stack --------\ | |
# ebp -> | padding | | |
# |---------------------------| | |
# ebp - 0x01 | more padding | | |
# |---------------------------| | |
# ebp - 0x02 | even more padding | | |
# |---------------------------| | |
# . . . <- How much padding? Hint: how | |
# |---------------------------| many bytes is password0? | |
# ebp - 0x0b | password0, second byte | | |
# |---------------------------| | |
# ebp - 0x0c | password0, first byte | | |
# |---------------------------| | |
# ebp - 0x0d | password1, last byte | | |
# |---------------------------| | |
# . . . | |
# |---------------------------| | |
# ebp - 0x10 | password1, first byte | | |
# |---------------------------| | |
# . . . | |
# |---------------------------| | |
# esp -> | | | |
# \---------------------------/ | |
# | |
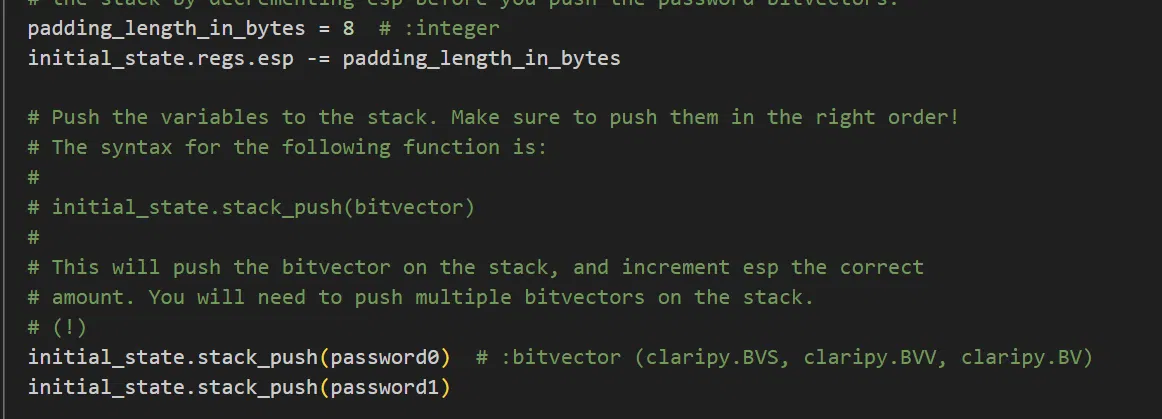
# Figure out how much space there is and allocate the necessary padding to | |
# the stack by decrementing esp before you push the password bitvectors. | |
padding_length_in_bytes = 8 # :integer | |
initial_state.regs.esp -= padding_length_in_bytes | |
# Push the variables to the stack. Make sure to push them in the right order! | |
# The syntax for the following function is: | |
# | |
# initial_state.stack_push(bitvector) | |
# | |
# This will push the bitvector on the stack, and increment esp the correct | |
# amount. You will need to push multiple bitvectors on the stack. | |
# (!) | |
initial_state.stack_push(password0) # :bitvector (claripy.BVS, claripy.BVV, claripy.BV) | |
initial_state.stack_push(password1) | |
simulation = project.factory.simgr(initial_state) | |
def is_successful(state): | |
stdout_output = state.posix.dumps(sys.stdout.fileno()) | |
return 'Good Job.'.encode() in stdout_output | |
def should_abort(state): | |
stdout_output = state.posix.dumps(sys.stdout.fileno()) | |
return 'Try again.'.encode() in stdout_output | |
simulation.explore(find=is_successful, avoid=should_abort) | |
if simulation.found: | |
solution_state = simulation.found[0] | |
solution0 = solution_state.solver.eval(password0) | |
solution1 = solution_state.solver.eval(password1) | |
solution = ' '.join(map(str, [ solution0, solution1 ])) | |
print(solution) | |
else: | |
raise Exception('Could not find the solution') | |
if __name__ == '__main__': | |
main(sys.argv) |
分析一下:
主要是这里:
实际上就是找到栈上的参数,用于做初始化状态,再进行符号执行
# 05_angr_symbolic_memory
对应到全局变量的方法
import angr | |
import claripy | |
import sys | |
proj = angr.Project('./angr', auto_load_libs=False) | |
start_address = 0x8049299 | |
initial_state = proj.factory.blank_state( | |
addr=start_address, | |
add_options = { angr.options.SYMBOL_FILL_UNCONSTRAINED_MEMORY, | |
angr.options.SYMBOL_FILL_UNCONSTRAINED_REGISTERS} | |
) | |
password0 = claripy.BVS('password0', 8*8) | |
password1 = claripy.BVS('password1', 8*8) | |
password2 = claripy.BVS('password2', 8*8) | |
password3 = claripy.BVS('password3', 8*8) | |
password0_address = 0xBFA1EE0 | |
initial_state.memory.store(password0_address, password0) | |
password1_address = 0xBFA1EE0 + 8 | |
initial_state.memory.store(password1_address, password1) | |
password2_address = 0xBFA1EE0 + 16 | |
initial_state.memory.store(password2_address, password2) | |
password3_address = 0xBFA1EE0 + 24 | |
initial_state.memory.store(password3_address, password3) | |
simgr = proj.factory.simgr(initial_state) | |
def is_successful(state): | |
stdout_output = state.posix.dumps(sys.stdout.fileno()) | |
return 'Good Job.'.encode() in stdout_output | |
def should_abort(state): | |
stdout_output = state.posix.dumps(sys.stdout.fileno()) | |
return 'Try again.'.encode() in stdout_output | |
simgr.explore(find = is_successful, avoid = should_abort) | |
solution_state = simgr.found[0] | |
solution0 = solution_state.solver.eval(password0,cast_to=bytes).decode() | |
solution1 = solution_state.solver.eval(password1,cast_to=bytes).decode() | |
solution2 = solution_state.solver.eval(password2,cast_to=bytes).decode() | |
solution3 = solution_state.solver.eval(password3,cast_to=bytes).decode() | |
solution = ' '.join([ solution0, solution1, solution2, solution3 ]) | |
print(solution) |
# 06_angr_symbolic_dynamic_memory
最早的仍旧能打通
不过这题主要还是教你把堆模拟(分配未分配过的内存即可)
fake_heap_address0 = 0x4444444 | |
pointer_to_malloc_memory_address0 = 0xa2def74 | |
initial_state.memory.store(pointer_to_malloc_memory_address0, fake_heap_address0, endness=project.arch.memory_endness, size=4) | |
fake_heap_address1 = 0x4444454 | |
pointer_to_malloc_memory_address1 = 0xa2def7c | |
initial_state.memory.store(pointer_to_malloc_memory_address1, fake_heap_address1, endness=project.arch.memory_endness, size=4) | |
# Store our symbolic values at our fake_heap_address. Look at the binary to | |
# determine the offsets from the fake_heap_address where scanf writes. | |
# (!) | |
initial_state.memory.store(fake_heap_address0, password0) | |
initial_state.memory.store(fake_heap_address1, password1) |
# 07_angr_symbolic_file
最早的仍旧能打通,而且官方的反而打不通 ee
还是贴一个官方的吧,其实就是教怎么模拟文件
# This challenge could, in theory, be solved in multiple ways. However, for the | |
# sake of learning how to simulate an alternate filesystem, please solve this | |
# challenge according to structure provided below. As a challenge, once you have | |
# an initial solution, try solving this in an alternate way. | |
# | |
# Problem description and general solution strategy: | |
# The binary loads the password from a file using the fread function. If the | |
# password is correct, it prints "Good Job." In order to keep consistency with | |
# the other challenges, the input from the console is written to a file in the | |
# ignore_me function. As the name suggests, ignore it, as it only exists to | |
# maintain consistency with other challenges. | |
# We want to: | |
# 1. Determine the file from which fread reads. | |
# 2. Use Angr to simulate a filesystem where that file is replaced with our own | |
# simulated file. | |
# 3. Initialize the file with a symbolic value, which will be read with fread | |
# and propogated through the program. | |
# 4. Solve for the symbolic input to determine the password. | |
import angr | |
import claripy | |
import sys | |
def main(argv): | |
path_to_binary = argv[1] | |
project = angr.Project(path_to_binary) | |
start_address = 0x80488bc | |
initial_state = project.factory.blank_state( | |
addr=start_address, | |
add_options = { angr.options.SYMBOL_FILL_UNCONSTRAINED_MEMORY, | |
angr.options.SYMBOL_FILL_UNCONSTRAINED_REGISTERS} | |
) | |
# Specify some information needed to construct a simulated file. For this | |
# challenge, the filename is hardcoded, but in theory, it could be symbolic. | |
# Note: to read from the file, the binary calls | |
# 'fread(buffer, sizeof(char), 64, file)'. | |
# (!) | |
filename = 'FOQVSBZB.txt' # :string | |
symbolic_file_size_bytes = 8 | |
# Construct a bitvector for the password and then store it in the file's | |
# backing memory. For example, imagine a simple file, 'hello.txt': | |
# | |
# Hello world, my name is John. | |
# ^ ^ | |
# ^ address 0 ^ address 24 (count the number of characters) | |
# In order to represent this in memory, we would want to write the string to | |
# the beginning of the file: | |
# | |
# hello_txt_contents = claripy.BVV('Hello world, my name is John.', 30*8) | |
# | |
# Perhaps, then, we would want to replace John with a | |
# symbolic variable. We would call: | |
# | |
# name_bitvector = claripy.BVS('symbolic_name', 4*8) | |
# | |
# Then, after the program calls fopen('hello.txt', 'r') and then | |
# fread(buffer, sizeof(char), 30, hello_txt_file), the buffer would contain | |
# the string from the file, except four symbolic bytes where the name would be | |
# stored. | |
# (!) | |
password = claripy.BVS('password', symbolic_file_size_bytes * 8) | |
# Construct the symbolic file. The file_options parameter specifies the Linux | |
# file permissions (read, read/write, execute etc.) The content parameter | |
# specifies from where the stream of data should be supplied. If content is | |
# an instance of SimSymbolicMemory (we constructed one above), the stream will | |
# contain the contents (including any symbolic contents) of the memory, | |
# beginning from address zero. | |
# Set the content parameter to our BVS instance that holds the symbolic data. | |
# (!) | |
password_file = angr.storage.SimFile(filename, content=password) | |
# Add the symbolic file we created to the symbolic filesystem. | |
initial_state.fs.insert(filename, password_file) | |
simulation = project.factory.simgr(initial_state) | |
def is_successful(state): | |
stdout_output = state.posix.dumps(sys.stdout.fileno()) | |
return 'Good Job.'.encode() in stdout_output | |
def should_abort(state): | |
stdout_output = state.posix.dumps(sys.stdout.fileno()) | |
return 'Try again.'.encode() in stdout_output | |
simulation.explore(find=is_successful, avoid=should_abort) | |
if simulation.found: | |
solution_state = simulation.found[0] | |
solution = solution_state.solver.eval(password,cast_to=bytes).decode() | |
print(solution) | |
else: | |
raise Exception('Could not find the solution') | |
if __name__ == '__main__': | |
main(sys.argv) |
ps. 找到 issue 了:
Scaffold and solution challenge 07 are not working with latest angr, because SimFile class changed.
This is working code with latest version of angr for the filesystem part:
  filename = "OJKSQYDP.txt"  # :string
  symbolic_file_size_bytes = 64

  password = claripy.BVS('password', symbolic_file_size_bytes * 8)
  password_file = angr.storage.SimFile(filename, content=password, size=symbolic_file_size_bytes)

  initial_state.fs.insert(filename, password_file)
  simulation = project.factory.simgr(initial_state)
TODO:改了 issue 仍旧打不通
# 08_angr_constraints
老 exp 打不通了,好耶(什)
原理:
# While you, as a human, can easily determine that this function is equivalent
# to simply comparing the strings, the computer cannot. Instead the computer
# would need to branch every time the if statement in the loop was called (16
# times), resulting in 2^16 = 65,536 branches, which will take too long of a
# time to evaluate for our needs.
TODO:这里尝试过在 check 的 jnz 地址处对 zf 寄存器状态做剪枝,也跑不出来,后续看看为啥
官方给的解法是手动获取模拟比较(设置终止状态在真正的 check 之前,然后手动设置比较),将其转化为 constraint,约束求解得到最终结果,贴一个吧先:
import angr | |
import claripy | |
import sys | |
def main(argv): | |
path_to_binary = argv[1] | |
project = angr.Project(path_to_binary) | |
start_address = 0x80492ED | |
initial_state = project.factory.blank_state( | |
addr=start_address, | |
add_options = { angr.options.SYMBOL_FILL_UNCONSTRAINED_MEMORY, | |
angr.options.SYMBOL_FILL_UNCONSTRAINED_REGISTERS} | |
) | |
password = claripy.BVS('password', 8*16) | |
password_address = 0x804C034 | |
initial_state.memory.store(password_address, password) | |
simulation = project.factory.simgr(initial_state) | |
address_to_check_constraint = 0x804933E | |
simulation.explore(find=address_to_check_constraint) | |
if simulation.found: | |
solution_state = simulation.found[0] | |
constrained_parameter_address = 0x804C034 | |
constrained_parameter_size_bytes = 16 | |
constrained_parameter_bitvector = solution_state.memory.load( | |
constrained_parameter_address, | |
constrained_parameter_size_bytes | |
) | |
constrained_parameter_desired_value = 'PPBVDNMJABAQHZQQ'.encode() | |
solution_state.add_constraints(constrained_parameter_bitvector == constrained_parameter_desired_value) | |
solution = solution_state.solver.eval(password,cast_to=bytes).decode() | |
print(solution) | |
else: | |
raise Exception('Could not find the solution') | |
if __name__ == '__main__': | |
main(sys.argv) |
# 09_angr_hooks
他说要 hook,但是我强行给他分段打通楽(什)
一开始写的 exp(注意给 password 初始值写上,开始的时候忘了)可以打通
import angr | |
import claripy | |
import sys | |
def main(argv): | |
path_to_binary = argv[1] | |
project = angr.Project(path_to_binary) | |
start_address = 0x80492FD | |
initial_state = project.factory.blank_state( | |
addr=start_address, | |
add_options = { angr.options.SYMBOL_FILL_UNCONSTRAINED_MEMORY, | |
angr.options.SYMBOL_FILL_UNCONSTRAINED_REGISTERS} | |
) | |
password = claripy.BVS('password', 8*16) | |
password_address = 0x804C038 | |
initial_state.memory.store(password_address, password) | |
simulation = project.factory.simgr(initial_state) | |
address_to_check_constraint = 0x804934E | |
simulation.explore(find=address_to_check_constraint) | |
if simulation.found: | |
solution_state = simulation.found[0] | |
constrained_parameter_address = 0x804C038 | |
constrained_parameter_size_bytes = 16 | |
constrained_parameter_bitvector = solution_state.memory.load( | |
constrained_parameter_address, | |
constrained_parameter_size_bytes | |
) | |
constrained_parameter_desired_value = 'PPBVDNMJABAQHZQQ'.encode() | |
solution_state.add_constraints(constrained_parameter_bitvector == constrained_parameter_desired_value) | |
solution = solution_state.solver.eval(password,cast_to=bytes).decode() | |
print(solution) | |
else: | |
raise Exception('Could not find the solution') | |
################################################# | |
path_to_binary = argv[1] | |
project = angr.Project(path_to_binary) | |
start_address = 0x804935B | |
initial_state = project.factory.blank_state( | |
addr=start_address, | |
add_options = { angr.options.SYMBOL_FILL_UNCONSTRAINED_MEMORY, | |
angr.options.SYMBOL_FILL_UNCONSTRAINED_REGISTERS} | |
) | |
password = claripy.BVS('password', 8*16) | |
password_address = 0x804C038 | |
initial_state.memory.store(password_address, password) | |
# 这里记得把 password 初始值写入 | |
pwd_addr = 0x804C04C | |
pwd = b'PPBVDNMJABAQHZQQ' | |
initial_state.memory.store(pwd_addr, pwd) | |
simulation = project.factory.simgr(initial_state) | |
address_to_check_constraint = 0x80493A3 | |
simulation.explore(find=address_to_check_constraint) | |
if simulation.found: | |
solution_state = simulation.found[0] | |
constrained_parameter_address = 0x804C038 | |
constrained_parameter_size_bytes = 16 | |
constrained_parameter_bitvector = solution_state.memory.load( | |
constrained_parameter_address, | |
constrained_parameter_size_bytes | |
) | |
check = solution_state.memory.load( | |
pwd_addr, | |
constrained_parameter_size_bytes | |
) | |
constrained_parameter_desired_value = check | |
solution_state.add_constraints(constrained_parameter_bitvector == constrained_parameter_desired_value) | |
solution = solution_state.solver.eval(password,cast_to=bytes).decode() | |
print(solution) | |
else: | |
raise Exception('Could not find the solution???') | |
if __name__ == '__main__': | |
main(sys.argv) |
然后看看官方怎么 hook 的
结论是这么写将中间那个过不去的函数转化为手动的 check,那比上一个的做法还简洁点点
主要就是这里:
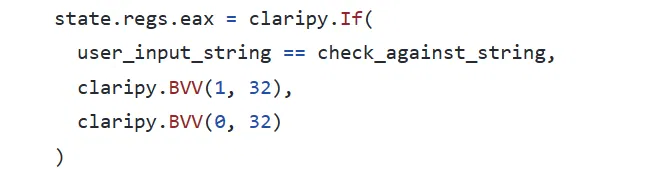
直接贴一个:
# This level performs the following computations: | |
# | |
# 1. Get 16 bytes of user input and encrypt it. | |
# 2. Save the result of check_equals_AABBCCDDEEFFGGHH (or similar) | |
# 3. Get another 16 bytes from the user and encrypt it. | |
# 4. Check that it's equal to a predefined password. | |
# | |
# The ONLY part of this program that we have to worry about is #2. We will be | |
# replacing the call to check_equals_ with our own version, using a hook, since | |
# check_equals_ will run too slowly otherwise. | |
import angr | |
import claripy | |
import sys | |
def main(argv): | |
path_to_binary = argv[1] | |
project = angr.Project(path_to_binary) | |
# Since Angr can handle the initial call to scanf, we can start from the | |
# beginning. | |
initial_state = project.factory.entry_state( | |
add_options = { angr.options.SYMBOL_FILL_UNCONSTRAINED_MEMORY, | |
angr.options.SYMBOL_FILL_UNCONSTRAINED_REGISTERS} | |
) | |
# Hook the address of where check_equals_ is called. | |
# (!) | |
check_equals_called_address = 0x80486ca | |
# The length parameter in angr.Hook specifies how many bytes the execution | |
# engine should skip after completing the hook. This will allow hooks to | |
# replace certain instructions (or groups of instructions). Determine the | |
# instructions involved in calling check_equals_, and then determine how many | |
# bytes are used to represent them in memory. This will be the skip length. | |
# (!) | |
instruction_to_skip_length = 5 | |
@project.hook(check_equals_called_address, length=instruction_to_skip_length) | |
def skip_check_equals_(state): | |
# Determine the address where user input is stored. It is passed as a | |
# parameter ot the check_equals_ function. Then, load the string. Reminder: | |
# int check_equals_(char* to_check, int length) { ... | |
user_input_buffer_address = 0x804a044 # :integer, probably hexadecimal | |
user_input_buffer_length = 16 | |
# Reminder: state.memory.load will read the stored value at the address | |
# user_input_buffer_address of byte length user_input_buffer_length. | |
# It will return a bitvector holding the value. This value can either be | |
# symbolic or concrete, depending on what was stored there in the program. | |
user_input_string = state.memory.load( | |
user_input_buffer_address, | |
user_input_buffer_length | |
) | |
# Determine the string this function is checking the user input against. | |
# It's encoded in the name of this function; decompile the program to find | |
# it. | |
check_against_string = 'OSIWHBXIFOQVSBZB'.encode() # :string | |
# gcc uses eax to store the return value, if it is an integer. We need to | |
# set eax to 1 if check_against_string == user_input_string and 0 otherwise. | |
# However, since we are describing an equation to be used by z3 (not to be | |
# evaluated immediately), we cannot use Python if else syntax. Instead, we | |
# have to use claripy's built in function that deals with if statements. | |
# claripy.If(expression, ret_if_true, ret_if_false) will output an | |
# expression that evaluates to ret_if_true if expression is true and | |
# ret_if_false otherwise. | |
# Think of it like the Python "value0 if expression else value1". | |
state.regs.eax = claripy.If( | |
user_input_string == check_against_string, | |
claripy.BVV(1, 32), | |
claripy.BVV(0, 32) | |
) | |
simulation = project.factory.simgr(initial_state) | |
def is_successful(state): | |
stdout_output = state.posix.dumps(sys.stdout.fileno()) | |
return 'Good Job.'.encode() in stdout_output | |
def should_abort(state): | |
stdout_output = state.posix.dumps(sys.stdout.fileno()) | |
return 'Try again.'.encode() in stdout_output | |
simulation.explore(find=is_successful, avoid=should_abort) | |
if simulation.found: | |
solution_state = simulation.found[0] | |
# Since we are allowing Angr to handle the input, retrieve it by printing | |
# the contents of stdin. Use one of the early levels as a reference. | |
solution = solution_state.posix.dumps(sys.stdin.fileno()).decode() | |
print(solution) | |
else: | |
raise Exception('Could not find the solution') | |
if __name__ == '__main__': | |
main(sys.argv) |
# 10_angr_simprocedures

将 check 部分的 basic block 拆了很多很多,看源码是加了不透明谓词和分发块:
ida 做了的伪代码做了代码优化,看起来其实和前面两个题差不多
但是下面这种写法不行,不知道是为啥不能这样 hook,这样 hook 的话约束不出来解:
(先 hook 找输入的地址,然后手写 check,但是约束不出来,跑出来空解)
import angr | |
import claripy | |
import sys | |
user_input_buffer_address = 0 | |
def main(argv): | |
path_to_binary = argv[1] | |
project = angr.Project(path_to_binary) | |
password = claripy.BVS('password', 8*16) | |
@project.hook(0x8049310) | |
def skip_check_equals_(state): | |
global user_input_buffer_address | |
user_input_buffer_address = state.solver.eval(state.regs.eax) | |
state.memory.store(user_input_buffer_address, password) | |
check_equals_called_address = 0x8049362 | |
simulation = project.factory.simgr() | |
simulation.explore(find=check_equals_called_address) | |
if simulation.found: | |
check_against_string = b'PPBVDNMJABAQHZQQ' | |
solution_state = simulation.found[0] | |
user_input_string = solution_state.memory.load( | |
user_input_buffer_address, | |
16 | |
) | |
solution_state.add_constraints(user_input_string == check_against_string) | |
print(solution_state.solver.eval(password,cast_to=bytes).decode()) | |
else: | |
raise Exception('Could not find the solution') | |
if __name__ == '__main__': | |
main(sys.argv) |
看看官方的吧:
import angr | |
import claripy | |
import sys | |
def main(argv): | |
path_to_binary = argv[1] | |
project = angr.Project(path_to_binary) | |
initial_state = project.factory.entry_state( | |
add_options = { angr.options.SYMBOL_FILL_UNCONSTRAINED_MEMORY, | |
angr.options.SYMBOL_FILL_UNCONSTRAINED_REGISTERS} | |
) | |
class ReplacementCheckEquals(angr.SimProcedure): | |
def run(self, to_check, length): | |
user_input_buffer_address = to_check | |
user_input_buffer_length = length | |
user_input_string = self.state.memory.load( | |
user_input_buffer_address, | |
user_input_buffer_length | |
) | |
check_against_string = 'OSIWHBXIFOQVSBZB'.encode() | |
return claripy.If( | |
user_input_string == check_against_string, | |
claripy.BVV(1, 32), | |
claripy.BVV(0, 32) | |
) | |
check_equals_symbol = 'check_equals_OSIWHBXIFOQVSBZB' # :string | |
project.hook_symbol(check_equals_symbol, ReplacementCheckEquals()) | |
simulation = project.factory.simgr(initial_state) | |
def is_successful(state): | |
stdout_output = state.posix.dumps(sys.stdout.fileno()) | |
return 'Good Job.'.encode() in stdout_output | |
def should_abort(state): | |
stdout_output = state.posix.dumps(sys.stdout.fileno()) | |
return 'Try again.'.encode() in stdout_output | |
simulation.explore(find=is_successful, avoid=should_abort) | |
if simulation.found: | |
solution_state = simulation.found[0] | |
solution = solution_state.posix.dumps(sys.stdin.fileno()).decode() | |
print(solution) | |
else: | |
raise Exception('Could not find the solution') | |
if __name__ == '__main__': | |
main(sys.argv) |
定义一个类,遇到 check 函数后直接 hook 并且跳过
简写偷一个,方便看:
import angr | |
import claripy | |
class MyCheckEquals(angr.SimProcedure): | |
def run(self, buffer_addr, length): | |
buffer = self.state.memory.load(buffer_addr, length) | |
return claripy.If(buffer == b'PPBVDNMJABAQHZQQ', claripy.BVV(1, 32), claripy.BVV(0, 32)) | |
proj = angr.Project('./angr') | |
proj.hook_symbol(symbol_name='check_equals_PPBVDNMJABAQHZQQ', simproc=MyCheckEquals()) | |
state = proj.factory.entry_state() | |
simgr = proj.factory.simgr(state) | |
simgr.explore( | |
find=lambda state : b'Good Job.' in state.posix.dumps(1), | |
avoid=lambda state: b'Try again.' in state.posix.dumps(1) | |
) | |
print(simgr.found[0].posix.dumps(0)) |
所以为啥我的跑不通
# 11_angr_sim_scanf
看起来比上个还过分一点
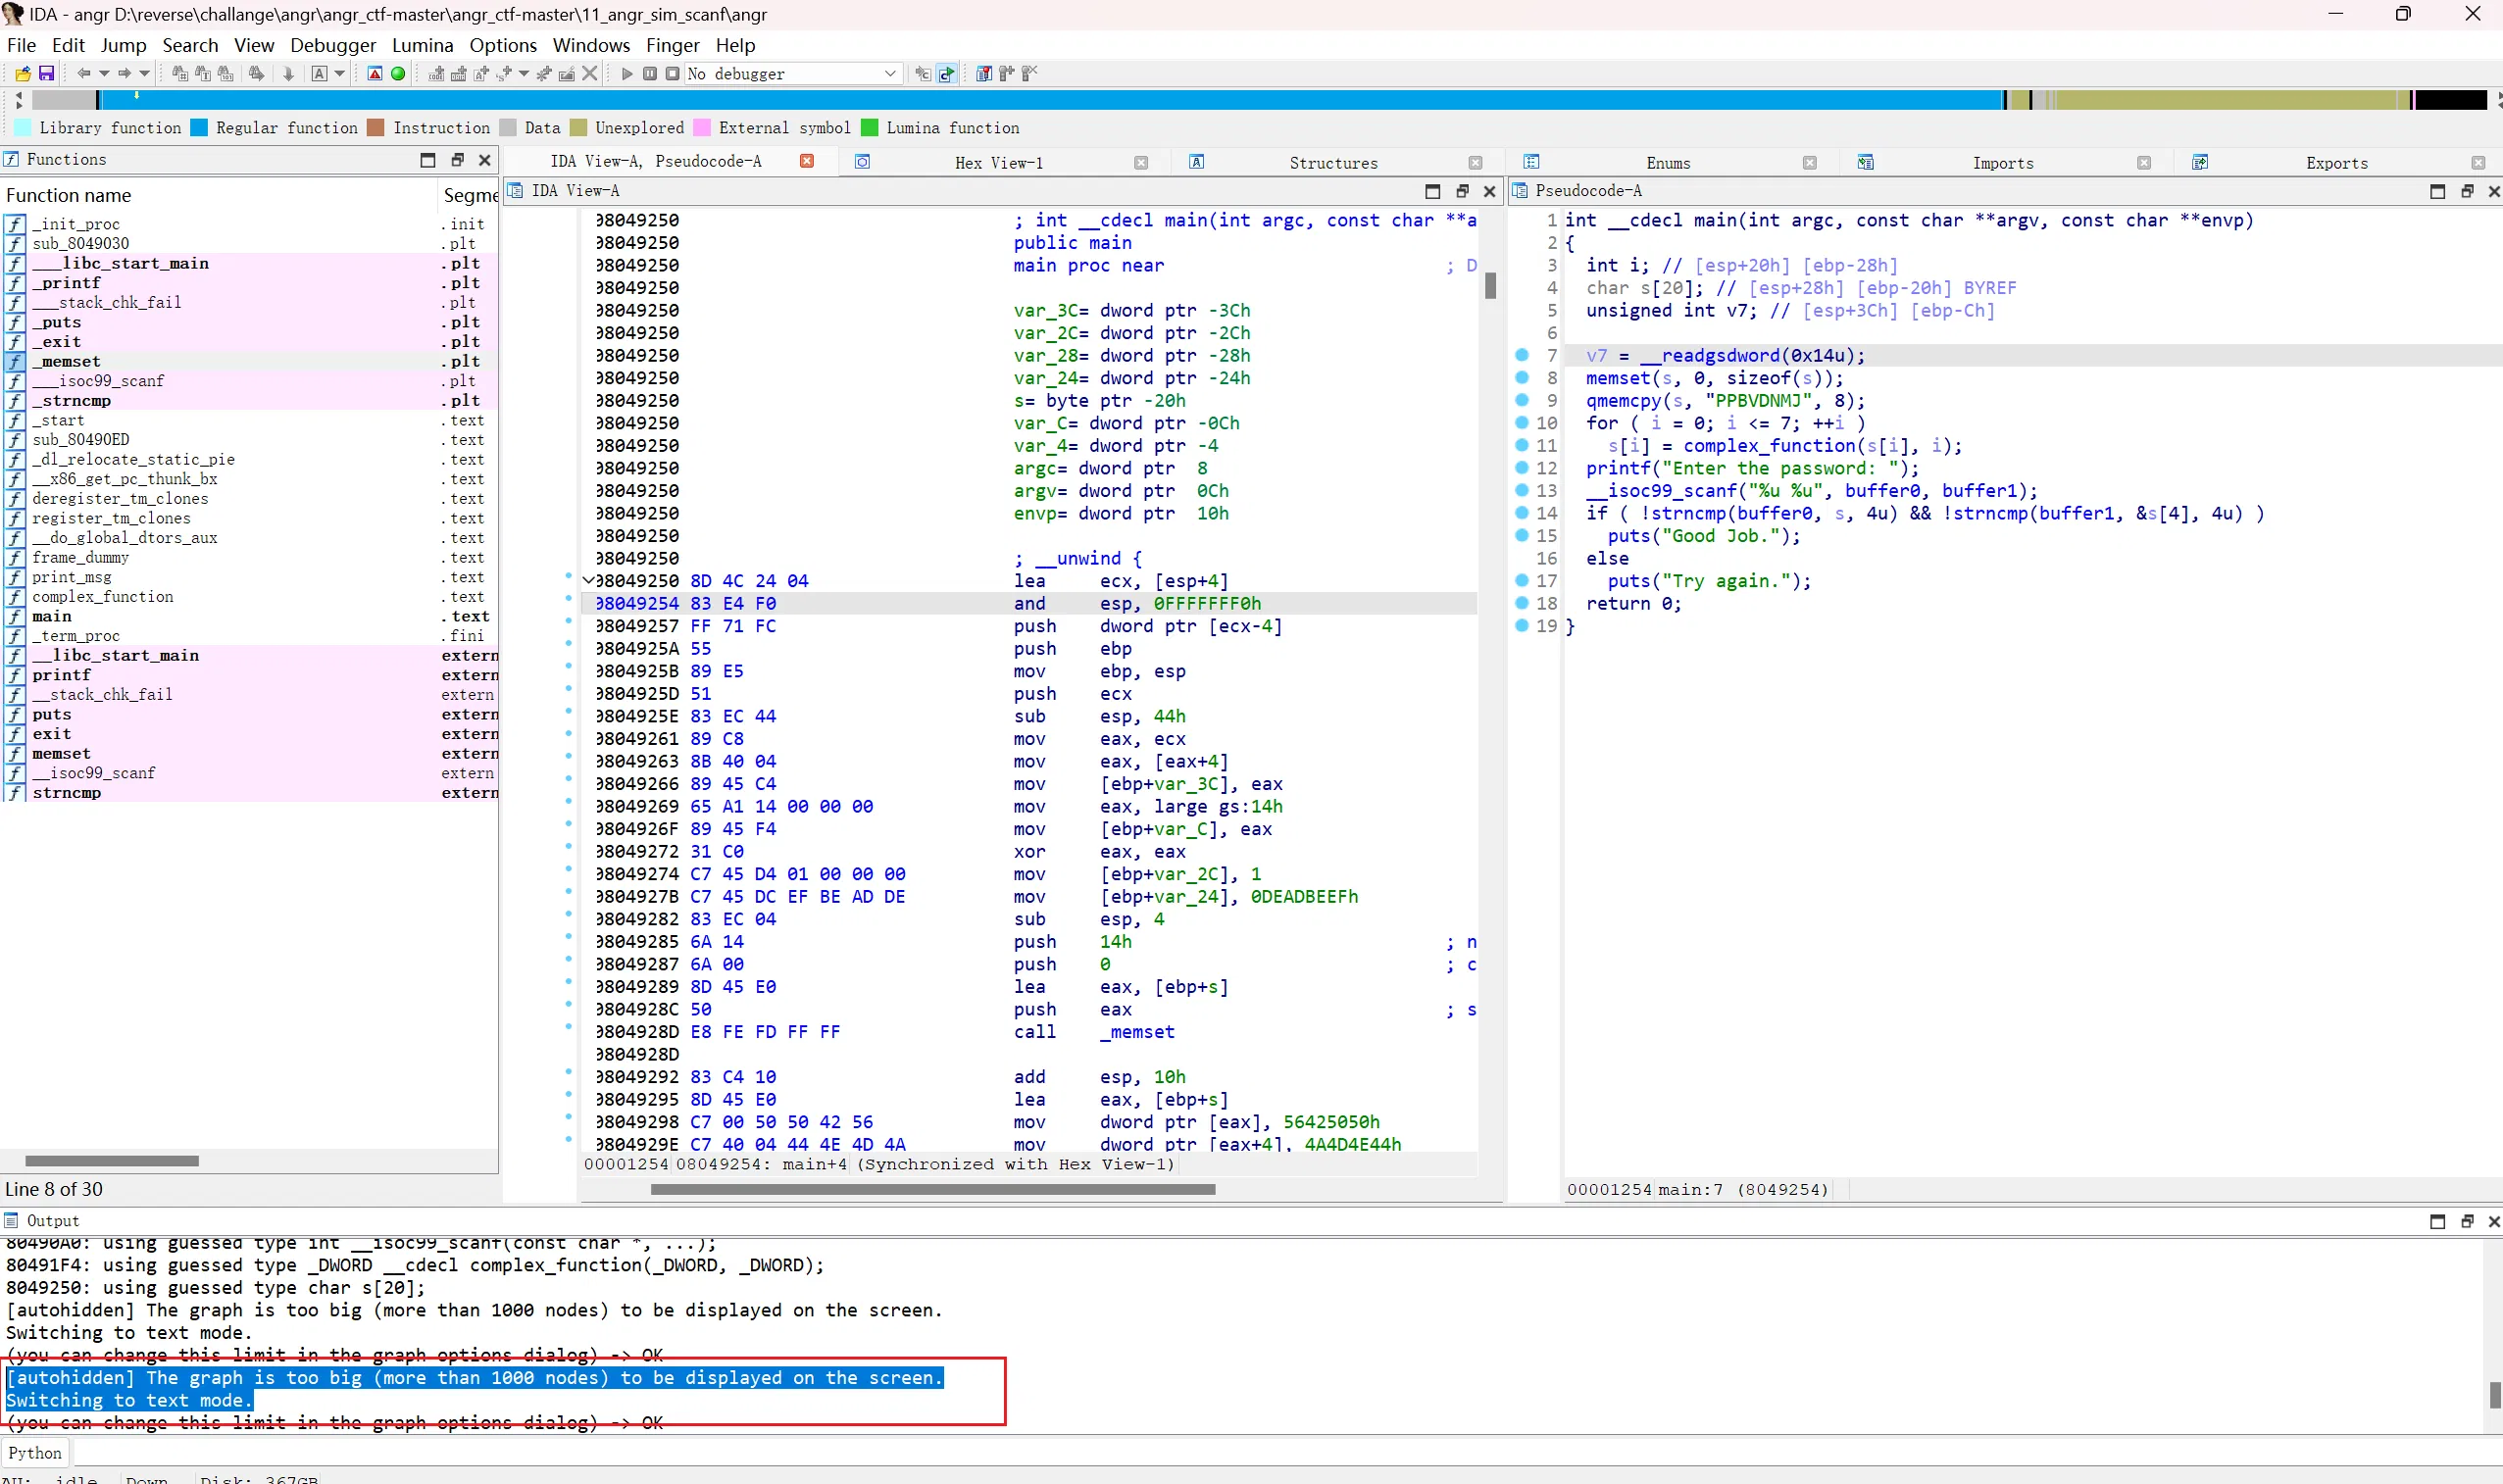
看起来是很多 scanf 了
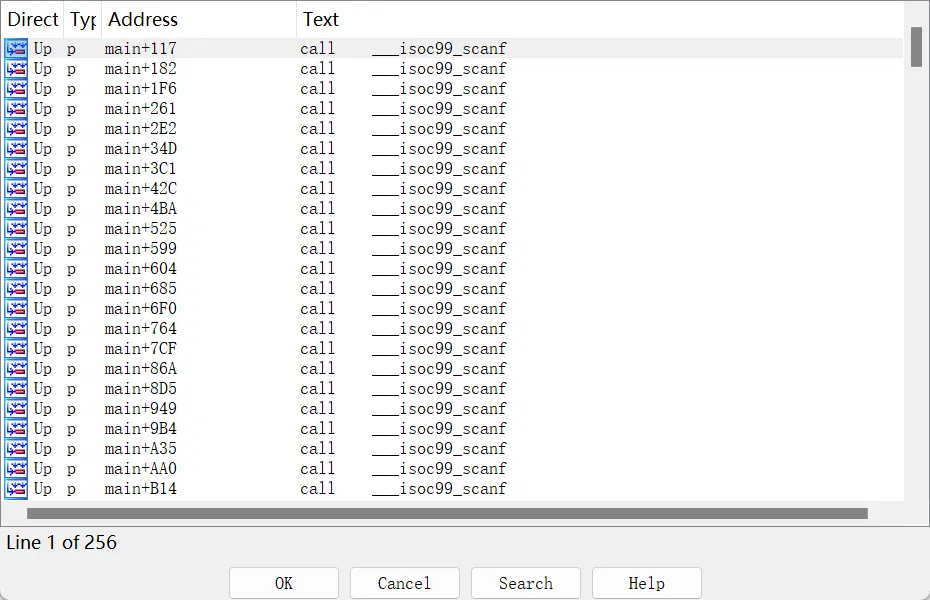
这个从源程序看起来可以直接手动 check 秒掉,还是小写一个
(然后其实 check 也是不必要的,就这样 hook 就行)
import angr | |
import claripy | |
import sys | |
user_input_buffer_address = 0 | |
tmp = '' | |
pwd = [] | |
def main(argv): | |
path_to_binary = argv[1] | |
project = angr.Project(path_to_binary) | |
@project.hook(0x80492D7) | |
def skip_check_equals_(state): | |
global user_input_buffer_address, tmp, pwd | |
user_input_buffer_address = state.solver.eval(state.regs.eax) | |
tmp += hex(state.solver.eval(state.memory.load(user_input_buffer_address,1)))[2:] | |
if (len(tmp) > 6): | |
tmp = [tmp[i:i+2] for i in range(len(tmp) - 2, -1 ,-2)] | |
tmp = ''.join(tmp) | |
pwd.append(int(tmp, 16)) | |
tmp = '' | |
check_equals_called_address = 0x80492E1 | |
simulation = project.factory.simgr() | |
simulation.explore(find=check_equals_called_address) | |
print(pwd) | |
if __name__ == '__main__': | |
main(sys.argv) |
来看看这题想考怎么个事
# This time, the solution involves simply replacing scanf with our own version,
# since Angr does not support requesting multiple parameters with scanf.
结果
import angr | |
proj = angr.Project('./angr') | |
state = proj.factory.entry_state() | |
simgr = proj.factory.simgr(state) | |
simgr.explore( | |
find=lambda state : b'Good Job.' in state.posix.dumps(1), | |
avoid=lambda state: b'Try again.' in state.posix.dumps(1) | |
) | |
print(simgr.found[0].posix.dumps(0)) |
其实可以打通的,结论是 angr 在不断进步~~,楽~~
不过这题还是想跟你说说 hook 系统函数的方法,其实也就是 hook 一下符号
# This time, the solution involves simply replacing scanf with our own version, | |
# since Angr does not support requesting multiple parameters with scanf. | |
import angr | |
import claripy | |
import sys | |
def main(argv): | |
path_to_binary = argv[1] | |
project = angr.Project(path_to_binary) | |
initial_state = project.factory.entry_state( | |
add_options = { angr.options.SYMBOL_FILL_UNCONSTRAINED_MEMORY, | |
angr.options.SYMBOL_FILL_UNCONSTRAINED_REGISTERS} | |
) | |
class ReplacementScanf(angr.SimProcedure): | |
# Finish the parameters to the scanf function. Hint: 'scanf("%u %u", ...)'. | |
# (!) | |
def run(self, format_string, scanf0_address, scanf1_address): | |
# Hint: scanf0_address is passed as a parameter, isn't it? | |
scanf0 = claripy.BVS('scanf0', 32) | |
scanf1 = claripy.BVS('scanf1', 32) | |
# The scanf function writes user input to the buffers to which the | |
# parameters point. | |
self.state.memory.store(scanf0_address, scanf0, endness=project.arch.memory_endness) | |
self.state.memory.store(scanf1_address, scanf1, endness=project.arch.memory_endness) | |
# Now, we want to 'set aside' references to our symbolic values in the | |
# globals plugin included by default with a state. You will need to | |
# store multiple bitvectors. You can either use a list, tuple, or multiple | |
# keys to reference the different bitvectors. | |
# (!) | |
self.state.globals['solution0'] = scanf0 | |
self.state.globals['solution1'] = scanf1 | |
scanf_symbol = '__isoc99_scanf' | |
project.hook_symbol(scanf_symbol, ReplacementScanf()) | |
simulation = project.factory.simgr(initial_state) | |
def is_successful(state): | |
stdout_output = state.posix.dumps(sys.stdout.fileno()) | |
return 'Good Job.'.encode() in stdout_output | |
def should_abort(state): | |
stdout_output = state.posix.dumps(sys.stdout.fileno()) | |
return 'Try again.'.encode() in stdout_output | |
simulation.explore(find=is_successful, avoid=should_abort) | |
if simulation.found: | |
solution_state = simulation.found[0] | |
# Grab whatever you set aside in the globals dict. | |
stored_solutions0 = solution_state.globals['solution0'] | |
stored_solutions1 = solution_state.globals['solution1'] | |
solution = f'{solution_state.solver.eval(stored_solutions0)} {solution_state.solver.eval(stored_solutions1)}' | |
print(solution) | |
else: | |
raise Exception('Could not find the solution') | |
if __name__ == '__main__': | |
main(sys.argv) |
# 12_angr_veritesting
???为什么又 hook 不成功了(这里因为代码又变了,想做一些新的尝试)
↓失败的代码
import angr | |
import claripy | |
import sys | |
user_input_buffer_address = 0 | |
tmp = '' | |
def main(argv): | |
path_to_binary = argv[1] | |
project = angr.Project(path_to_binary) | |
@project.hook(0x80492D6) | |
def skip_check_equals_(state): | |
global tmp | |
tmp += chr(state.solver.eval(state.memory.load(state.solver.eval(state.regs.eax),2))) | |
print(state.solver.eval(state.memory.load(state.solver.eval(state.regs.eax),2))) | |
@project.hook(0x8049287) | |
def skip_check_equals_(state,length = 20): | |
print('---') | |
check_equals_called_address = 0x80492EB | |
simulation = project.factory.simgr() | |
simulation.explore(find=check_equals_called_address) | |
print(tmp) | |
if __name__ == '__main__': | |
main(sys.argv) |
这里进行一点 debug 看看…
修改代码如下:
import angr | |
import claripy | |
user_input_buffer_address = 0 | |
tmp = '' | |
def main(): | |
project = angr.Project('./angr') | |
@project.hook(0x80492D6) | |
def hook_for_fun(state, length = 11): | |
global tmp | |
tmp += chr(state.solver.eval((state.solver.eval(state.regs.eax)))) | |
# print( state.solver.eval((state.solver.eval(state.regs.eax))) ) | |
print(chr(state.solver.eval((state.solver.eval(state.regs.eax)))), end = ' ') | |
@project.hook(0x8049287) | |
def skip_scanf(state, length = 20): | |
print('---') | |
check_equals_called_address = 0x80492EB | |
simulation = project.factory.simgr() | |
# @project.hook(0x80492B5) | |
# def skip_stash(state, length = 14): | |
# nonlocal simulation | |
# print("len : " + str(len(simulation.stashes))) | |
simulation.explore(find=check_equals_called_address) | |
print(tmp) | |
if __name__ == '__main__': | |
main() |
打印的内容如下:
T W W Z Z Z Z C C C C C C C C F F F F F F F F F F F F F F F F I I I I I I I I I I I I I I I I I I I I I I I I I I I I I I I I L L L L L L L L L L L L L L L L L L L L L L L L L L L L L L L L L L L L L L L L L L L L L L L L L L L L L L L L L L L L L L L L
实际上,这里去重之后就是正确答案了,说明这里出现了路径爆炸,在某个地方被分化,stash 内路径数量翻倍了,导致每次 bfs 路径都幂指数上升了
猜测是因为输入的不确定,在赋值的时候就需要 hook 掉,把这段补上(打印 stash 的长度看眼):
@project.hook(0x80492B5) | |
def skip_stash(state, length = 14): | |
nonlocal simulation | |
print("len : " + str(len(simulation.stashes))) |
看一下目前 hook 后剩下的代码(ida 中 patch 替代)
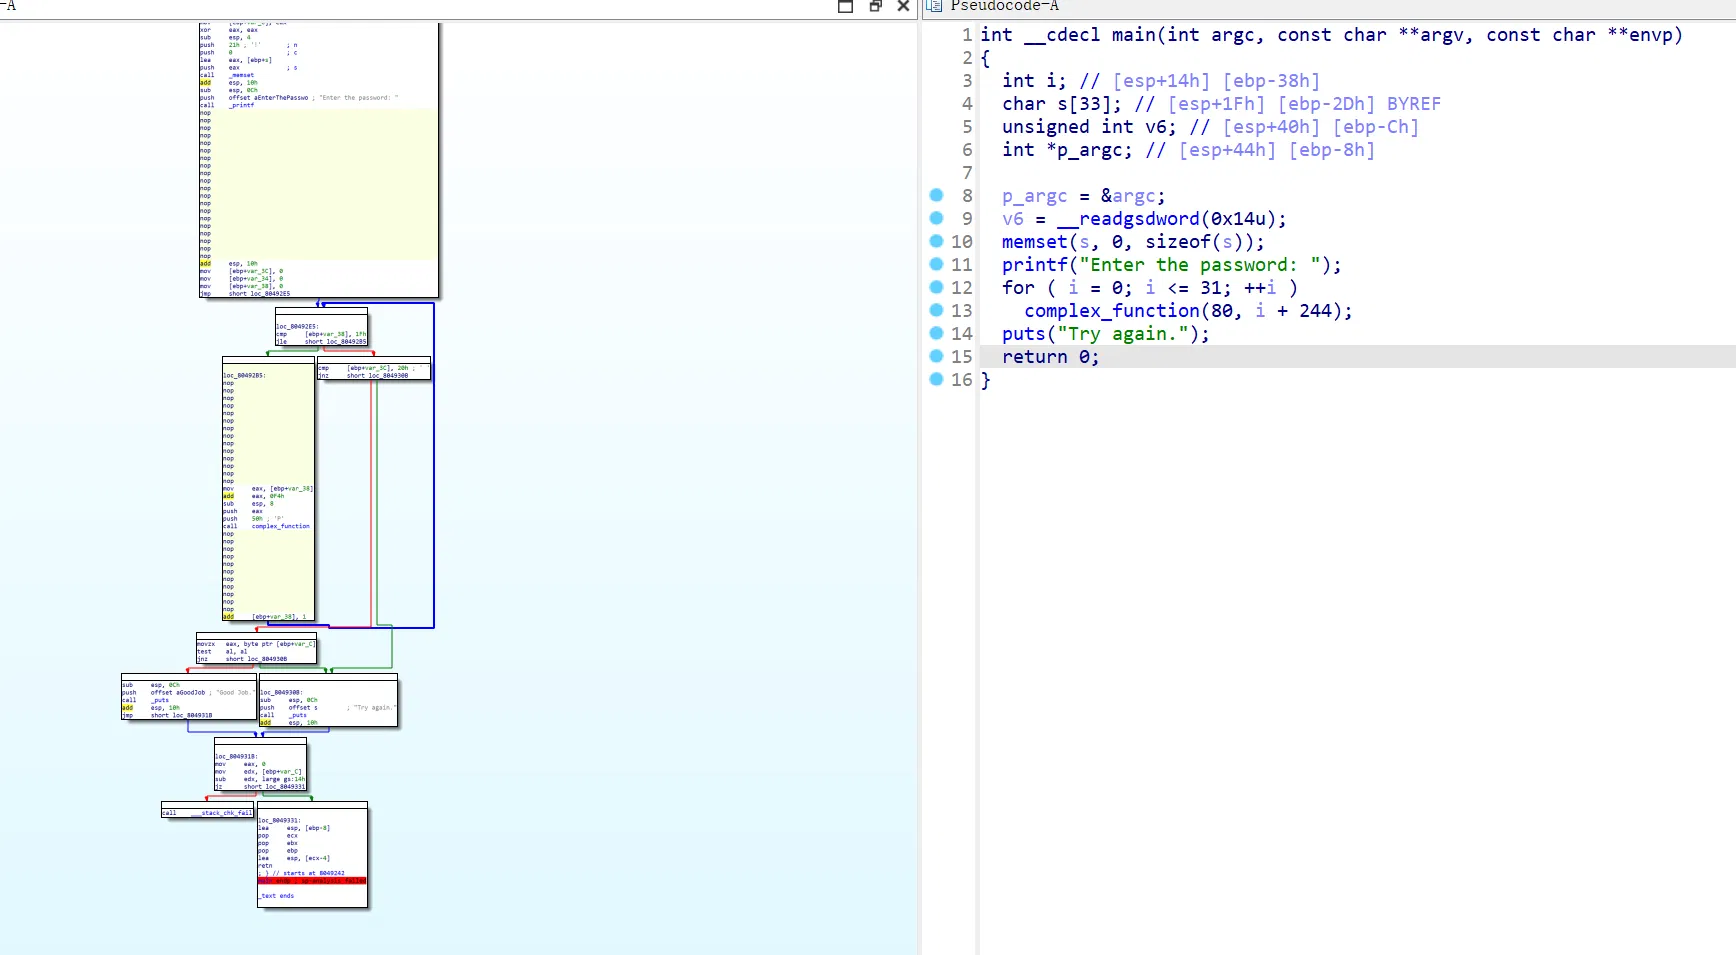
晚上睡前想着,会不会是循环的时候 jle 给分化出来了 stash,但是早起看了眼前面的程序,也是循环应该没有问题的
加上上面又 hook 的代码,输出大约如下:
len : 9
T len : 9
len : 9
W W len : 9
len : 9
len : 9
len : 9
Z Z Z Z len : 9
len : 9
len : 9
len : 9
len : 9
len : 9
len : 9
len : 9
C C C C C C C C len : 9
len : 9
len : 9
len : 9
len : 9
len : 9
len : 9
len : 9
len : 9
len : 9
len : 9
len : 9
len : 9
len : 9
len : 9
len : 9
F F F F F F F F F F F F F F F F len : 9
结果 stash 长度并没有变化,但是仍旧有路径分化的现象,这就有些闹鬼了
打在上面看看:
import angr | |
import claripy | |
user_input_buffer_address = 0 | |
tmp = '' | |
def main(): | |
project = angr.Project('./angr') | |
@project.hook(0x80492D6) | |
def hook_for_fun(state, length = 11): | |
global tmp | |
tmp += chr(state.solver.eval((state.solver.eval(state.regs.eax)))) | |
# print( state.solver.eval((state.solver.eval(state.regs.eax))) ) | |
print(chr(state.solver.eval((state.solver.eval(state.regs.eax)))), end = ' ') | |
nonlocal simulation | |
print("len : " + str(len(simulation.stashes))) | |
@project.hook(0x8049287) | |
def skip_scanf(state, length = 20): | |
print('---') | |
check_equals_called_address = 0x80492EB | |
simulation = project.factory.simgr() | |
@project.hook(0x80492B5) | |
def skip_stash(state, length = 14): | |
1 == 1 | |
simulation.explore(find=check_equals_called_address) | |
print(tmp) | |
if __name__ == '__main__': | |
main() |
结论是 stash 还是 9,为啥 9 啊,整个程序才 9 个 basic block ,结束地址前面已经不存在分支了
这里直接从 scanf 后面开始 init blank_state 也是一样的结果,说明不是 scanf 或者环境变量传入的问题
问了 r1mao 学长,发现这里对 stash 和 state 的理解有点问题了:
state 会分在不同 types 的 stash,如果这里打印 simulation.active 的话,得到的就是当前的 state 数量,和执行的重复数量结果是一致的
active len : 32
stashLen : 9
打印一下 stash 和 state 的结构
实际上是这样子的
stash:
----------------------------------------------------------------------------------------
active              |              kill              |              etc.
   |							    |							     |
   ----> active state               ----> killed state				 ----> else state
所以应该这样子用:
simulation.stashes['active'] |
检查一下是不是 jle 惹的锅
@project.hook(0x80492E9) | |
def test01(state): | |
print("len before jle",len(simulation.stashes['active'])) | |
@project.hook(0x80492B5) | |
def test01(state): | |
print("len after jle",len(simulation.stashes['active'])) |
不是,那还好:
len before jle 1
len after jle 1
len before jle 2
len before jle 2
len after jle 2
len after jle 2
同理,只剩一个地方了…
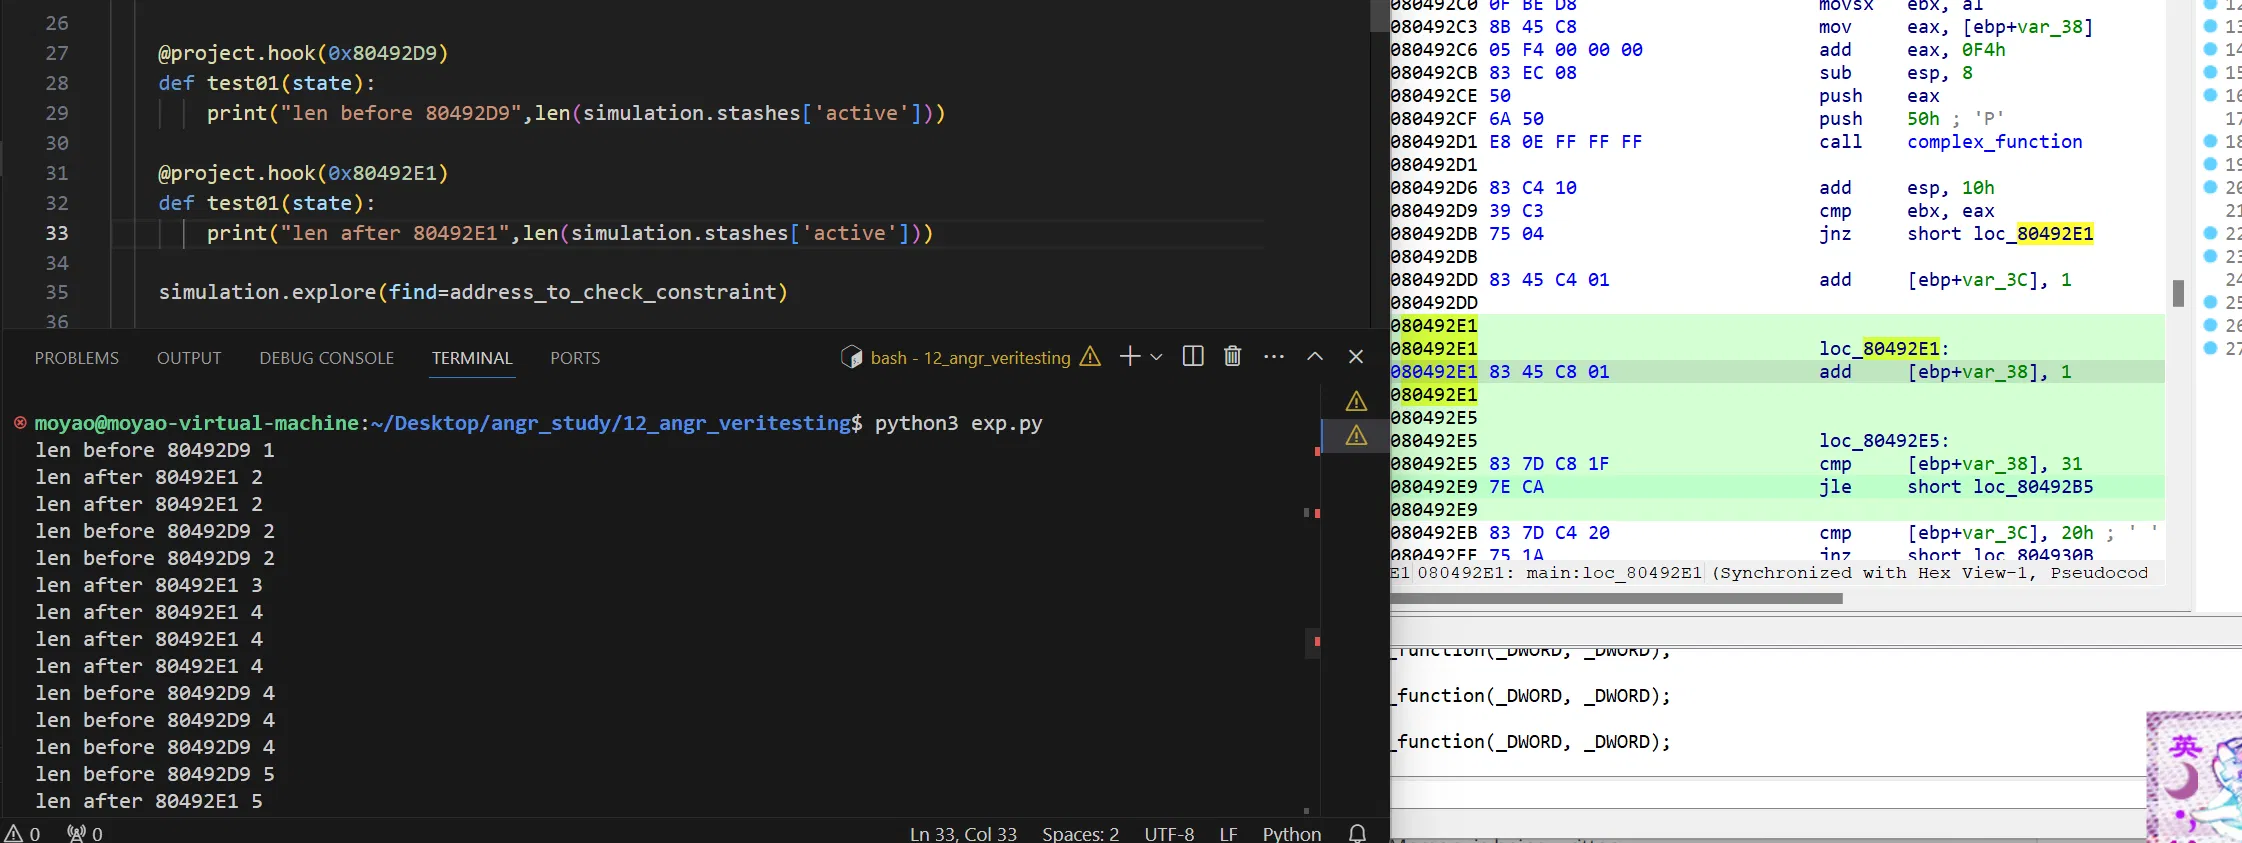
这下赛博鬼抓到了…hook 以后机器指令没跳过去…
ok,找到了,语法错误,也没报…
exp:
import angr | |
import claripy | |
import sys | |
tmp = '' | |
def main(): | |
project = angr.Project("./angr") | |
start_address = 0x80492A5 | |
initial_state = project.factory.blank_state( | |
addr=start_address, | |
add_options = { angr.options.SYMBOL_FILL_UNCONSTRAINED_MEMORY, | |
angr.options.SYMBOL_FILL_UNCONSTRAINED_REGISTERS} | |
) | |
simulation = project.factory.simgr(initial_state) | |
address_to_check_constraint = 0x80492EB | |
@project.hook(0x80492D6, length = 11) | |
def hook_for_fun(state): | |
global tmp | |
tmp += chr(state.solver.eval((state.solver.eval(state.regs.eax)))) | |
simulation.explore(find=address_to_check_constraint) | |
print(tmp) | |
if __name__ == '__main__': | |
main() |
还是看看官方吧,虽然被折磨了一把…
这里是想教你用 veritesting ,这样子 veritesting=True 即可
import angr | |
proj = angr.Project('../dist/12_angr_veritesting') | |
state = proj.factory.entry_state() | |
simgr = proj.factory.simgr(state, veritesting=True) | |
simgr.explore( | |
find=lambda state : b'Good Job.' in state.posix.dumps(1), | |
avoid=lambda state: b'Try again.' in state.posix.dumps(1) | |
) | |
print(simgr.found[0].posix.dumps(0)) |
# 13_angr_static_binary
可以看到原本的 strcmp 函数被分解成了很复杂的样子,会导致 angr 陷进去出不来了,其他库函数也一样
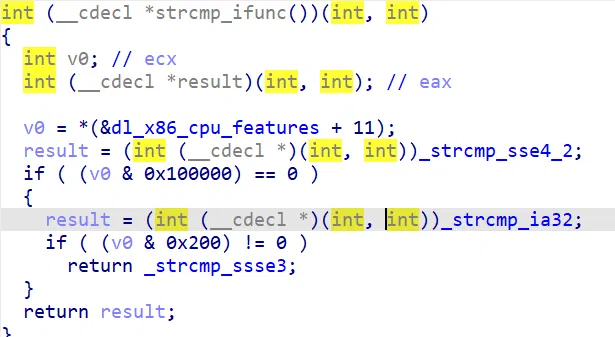
这里是编译时加了静态链接的参数导致的

把系统函数 hook 掉换成 libc 和 glibc 里的标准符号即可
import angr | |
proj = angr.Project('./angr') | |
proj.hook(0x8051E40, angr.SIM_PROCEDURES['libc']['printf']()) | |
proj.hook(0x8051E90, angr.SIM_PROCEDURES['libc']['scanf']()) | |
proj.hook(0x805EBE0, angr.SIM_PROCEDURES['libc']['puts']()) | |
proj.hook(0x804AB50, angr.SIM_PROCEDURES['glibc']['__libc_start_main']()) | |
state = proj.factory.entry_state() | |
simgr = proj.factory.simgr(state, veritesting=True) | |
simgr.explore( | |
find=lambda state : b'Good Job.' in state.posix.dumps(1), | |
avoid=lambda state: b'Try again.' in state.posix.dumps(1) | |
) | |
print(simgr.found[0].posix.dumps(0)) |
# 14_angr_shared_library
坏了,这题目编译不明白了开始

直接 gh 上拿了… 懒得研究了…
从 so 里面导入的 check:
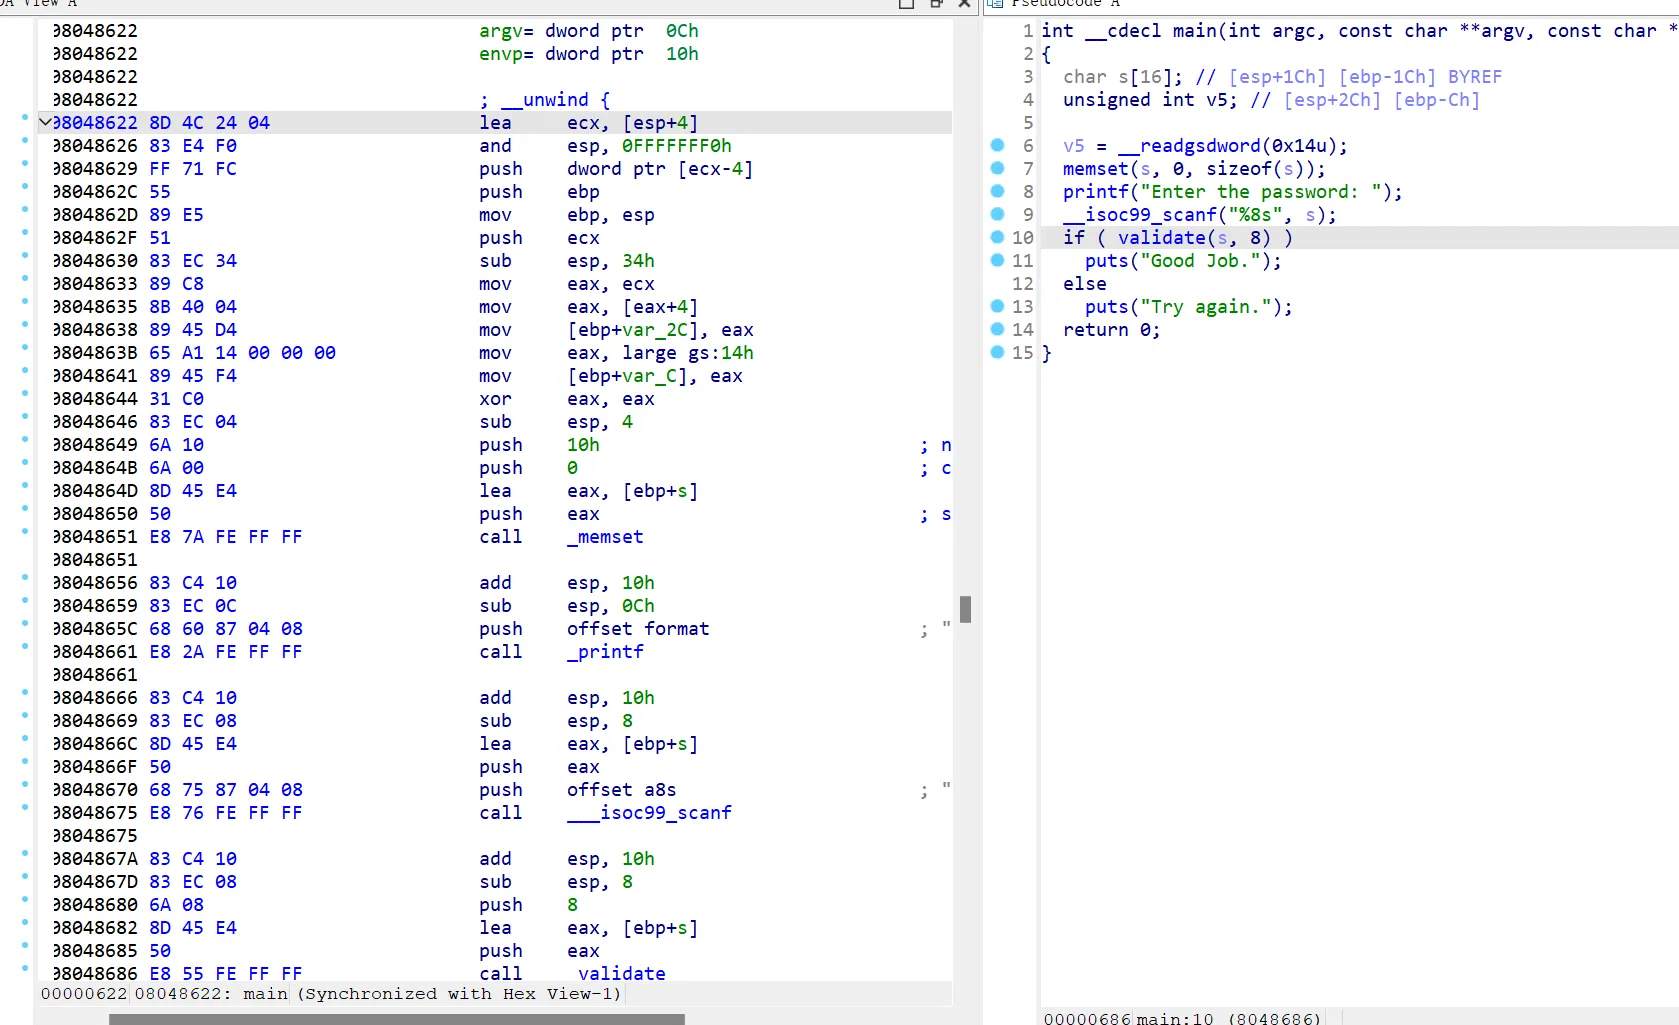
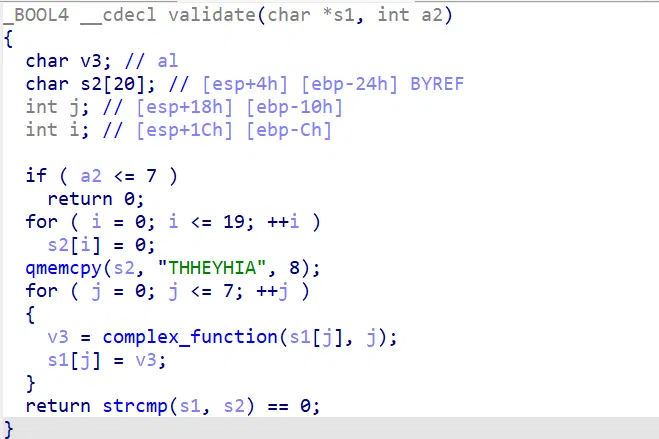
直接看官方 exp 吧(也就是做了个模拟,不过这个挺经典的感觉,后面单独模拟函数会很用得上):
# The shared library has the function validate, which takes a string and returns | |
# either true (1) or false (0). The binary calls this function. If it returns | |
# true, the program prints "Good Job." otherwise, it prints "Try again." | |
# | |
# Note: When you run this script, make sure you run it on | |
# lib14_angr_shared_library.so, not the executable. This level is intended to | |
# teach how to analyse binary formats that are not typical executables. | |
import angr | |
import claripy | |
import sys | |
def main(argv): | |
path_to_binary = argv[1] | |
# The shared library is compiled with position-independent code. You will need | |
# to specify the base address. All addresses in the shared library will be | |
# base + offset, where offset is their address in the file. | |
# (!) | |
base = 0x4000000 | |
project = angr.Project(path_to_binary, load_options={ | |
'main_opts' : { | |
'base_addr' : base | |
} | |
}) | |
# Initialize any symbolic values here; you will need at least one to pass to | |
# the validate function. | |
# (!) | |
buffer_pointer = claripy.BVV(0x3000000, 32) # 这里乱写一个就行 | |
# Begin the state at the beginning of the validate function, as if it was | |
# called by the program. Determine the parameters needed to call validate and | |
# replace 'parameters...' with bitvectors holding the values you wish to pass. | |
# Recall that 'claripy.BVV(value, size_in_bits)' constructs a bitvector | |
# initialized to a single value. | |
# Remember to add the base value you specified at the beginning to the | |
# function address! | |
# Hint: int validate(char* buffer, int length) { ... | |
# (!) | |
validate_function_address = base + 0x670 | |
initial_state = project.factory.call_state( | |
validate_function_address, | |
buffer_pointer, | |
claripy.BVV(8, 32), | |
add_options = { angr.options.SYMBOL_FILL_UNCONSTRAINED_MEMORY, | |
angr.options.SYMBOL_FILL_UNCONSTRAINED_REGISTERS} | |
) | |
# Inject a symbolic value for the password buffer into the program and | |
# instantiate the simulation. Another hint: the password is 8 bytes long. | |
# (!) | |
password = claripy.BVS('password', 8*8) | |
initial_state.memory.store(buffer_pointer, password) | |
simulation = project.factory.simgr(initial_state) | |
# We wish to reach the end of the validate function and constrain the | |
# return value of the function (stored in eax) to equal true (value of 1) | |
# just before the function returns. We could use a hook, but instead we | |
# can search for the address just before the function returns and then | |
# constrain eax | |
# (!) | |
check_constraint_address = base + 0x71c | |
simulation.explore(find=check_constraint_address) | |
if simulation.found: | |
solution_state = simulation.found[0] | |
# Determine where the program places the return value, and constrain it so | |
# that it is true. Then, solve for the solution and print it. | |
# (!) | |
solution_state.add_constraints(solution_state.regs.eax != 0) | |
solution = solution_state.solver.eval(password,cast_to=bytes).decode() | |
print(solution) | |
else: | |
raise Exception('Could not find the solution') | |
if __name__ == '__main__': | |
main(sys.argv) |
莫名其妙的下面变成 pwn 题了…
# -pwn-
# 15_angr_arbitrary_read
乍看一下就很怪了,只得翻 exp,发现是用 pwn…
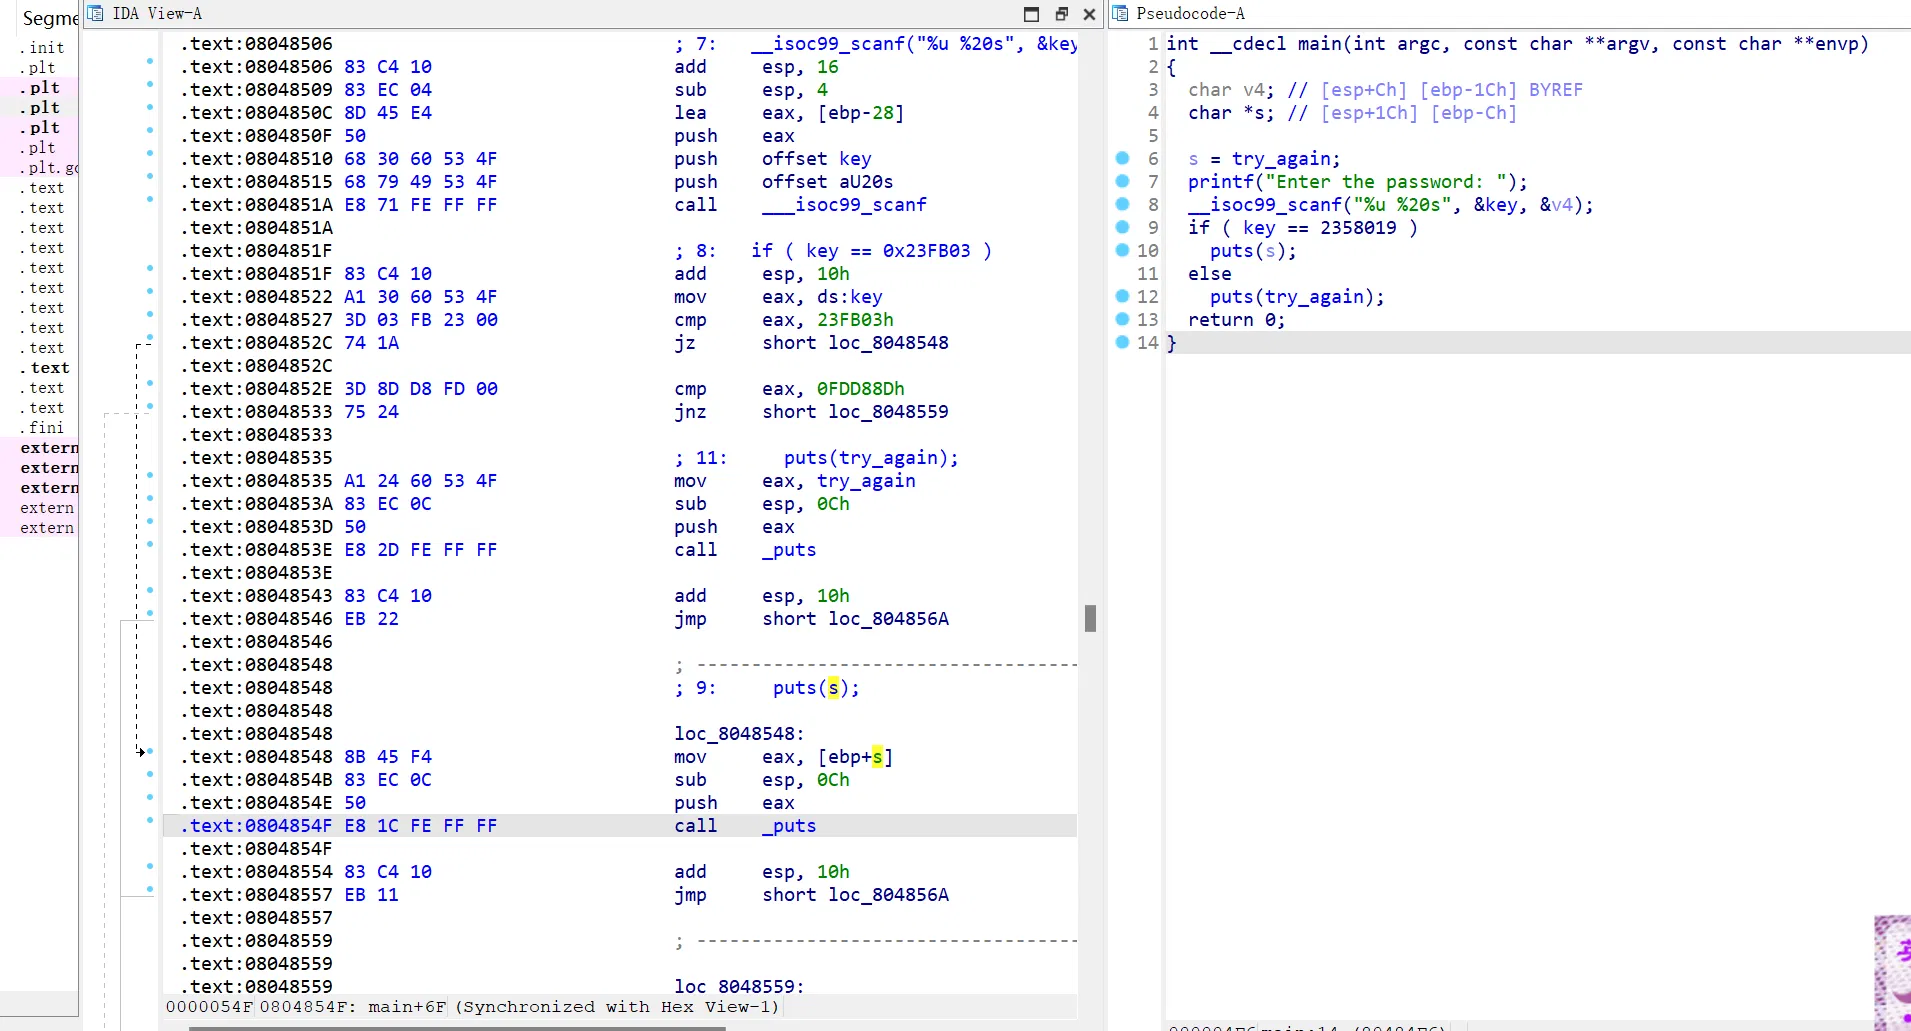
那这里到了期待已久的 auto pwn 环节哩